Getting Started with Postman Collections

Postman is a great way to document and save example requests for your API. Konfig supports generating SDKs from Postman Collections through the Postman Collection Format. In this tutorial, we will walk through the steps for you to generate a TypeScript, Java, and Python SDK from a Postman Collection.
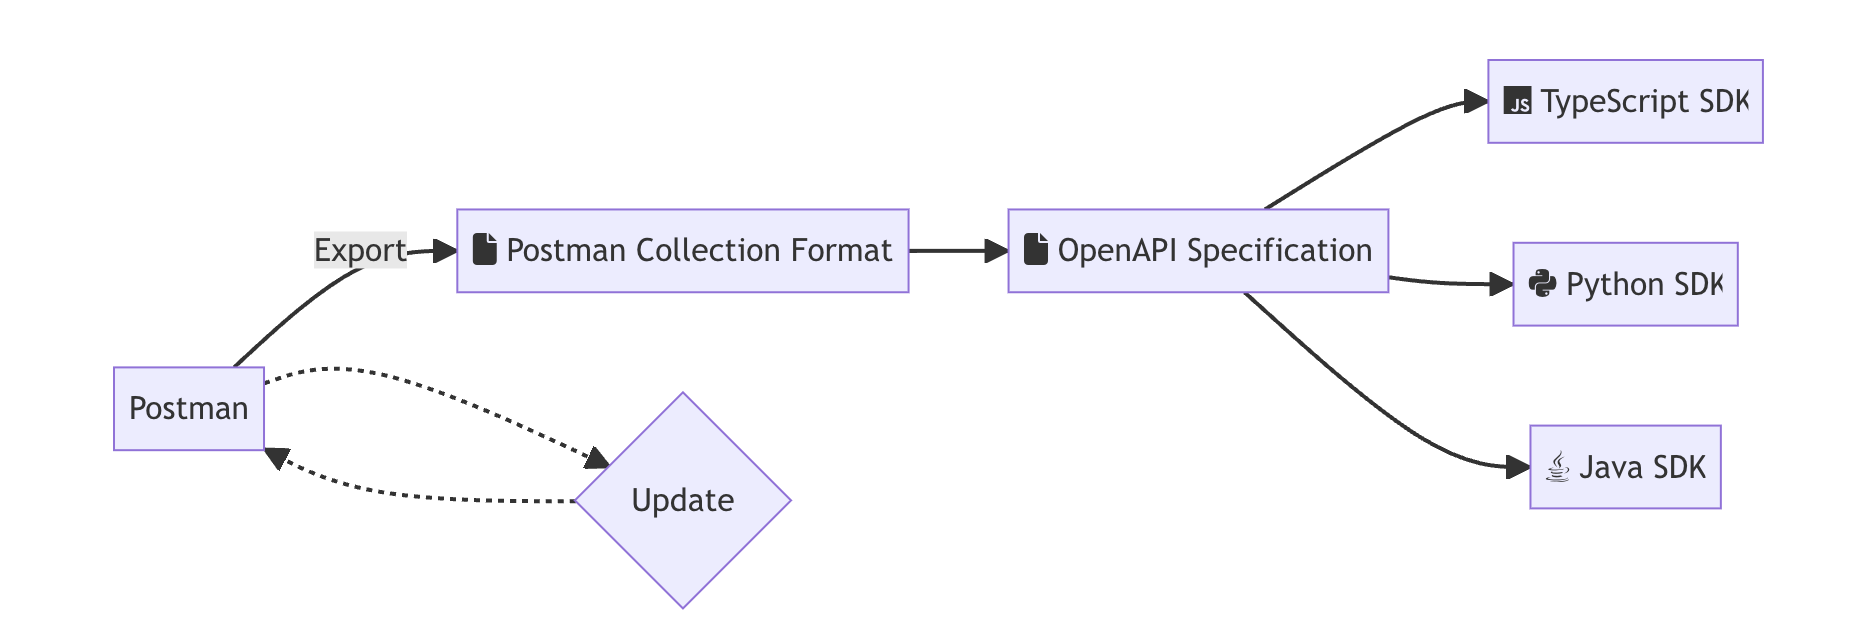
How does it work?
Konfig infers the interface of your API from request and response examples in your Postman Collection. Konfig then intelligently creates a high-quality OAS which is then used to generate SDKs.
Install CLI
To install Konfig's CLI run the following command:
Konfig's CLI requires Node 14+ to be setup on your machine.
Create a directory for SDKs
Prepare your Postman Collection
Every operation in your Collection should have more example responses saved before exporting for better SDKs.
Organize requests into folders
Placing requests under folders will help Konfig group operations together in the generated SDKs.
Parameterize request paths
Hard-coded values for variables such as path parameters will not be correctly
inferred as variables in the generated SDKs. For example, if you have a request
path /project/1234, the SDKs will not know that 1234 is a variable.
Instead of /project/1234, use /project/:projectId.
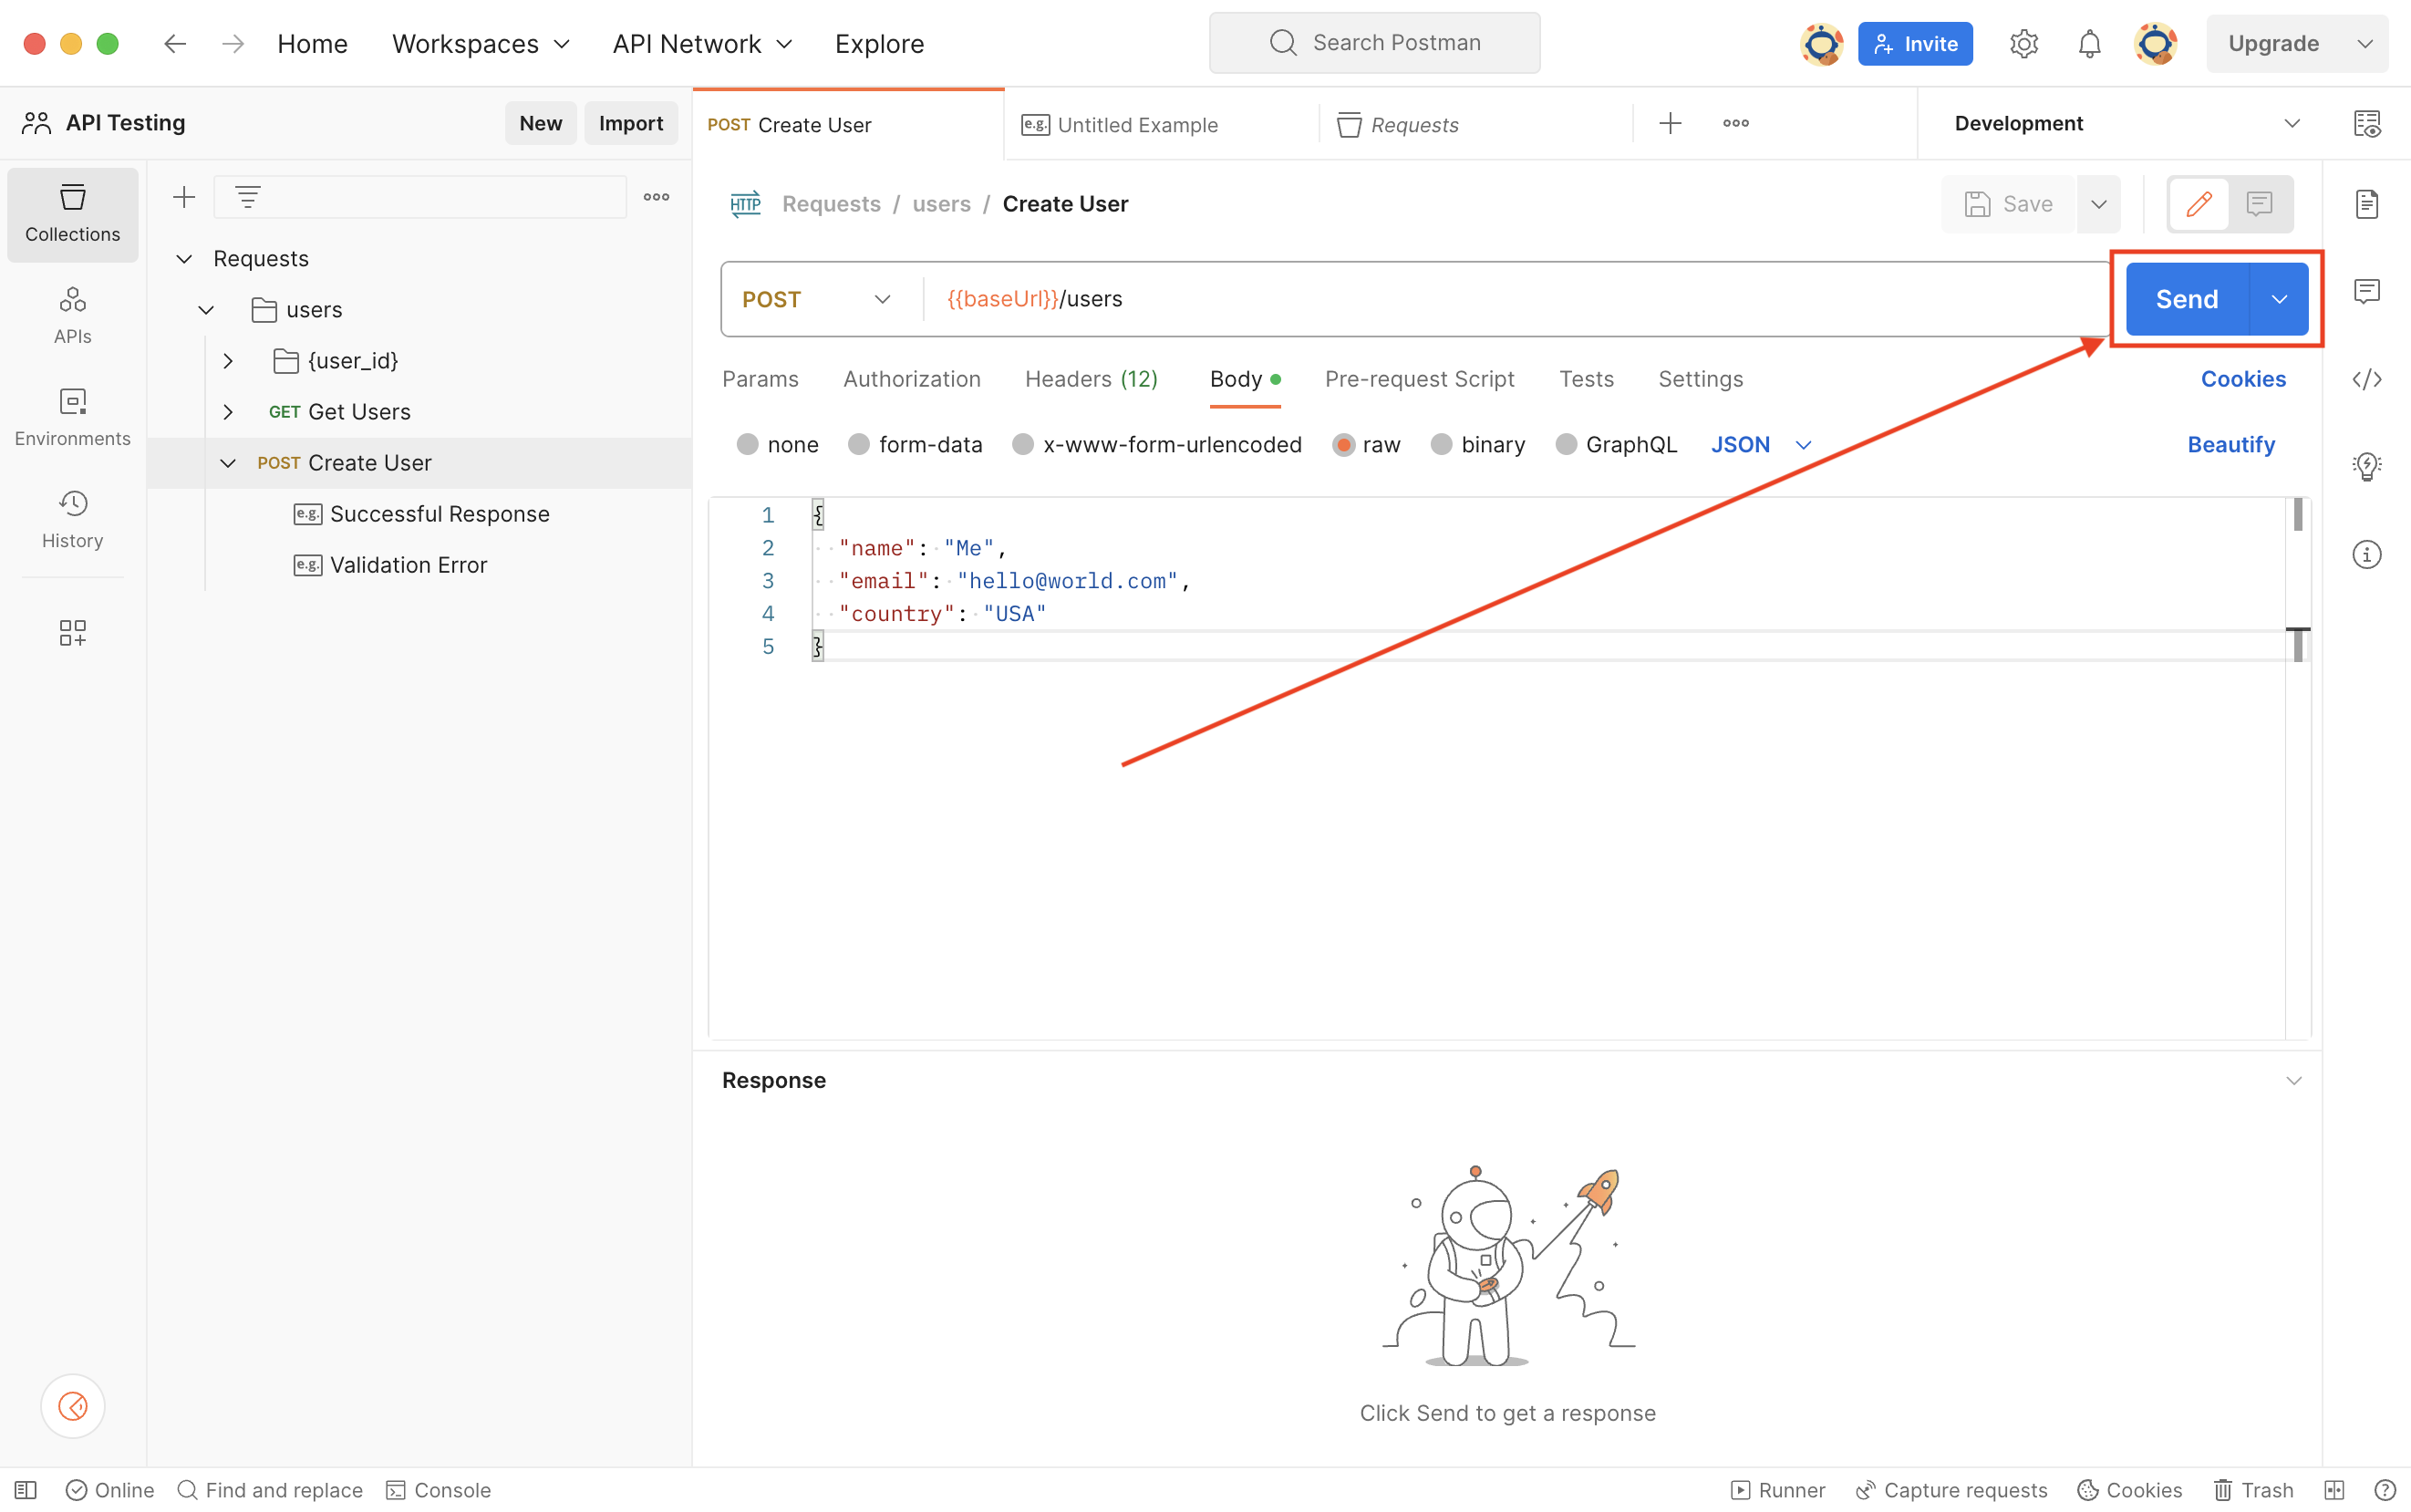
Send Request
Click Send to retrieve an example response. You can repeat these steps for
different inputs to save multiple example responses. The more requests and
responses saved in the Collection, the better your SDKs will be.
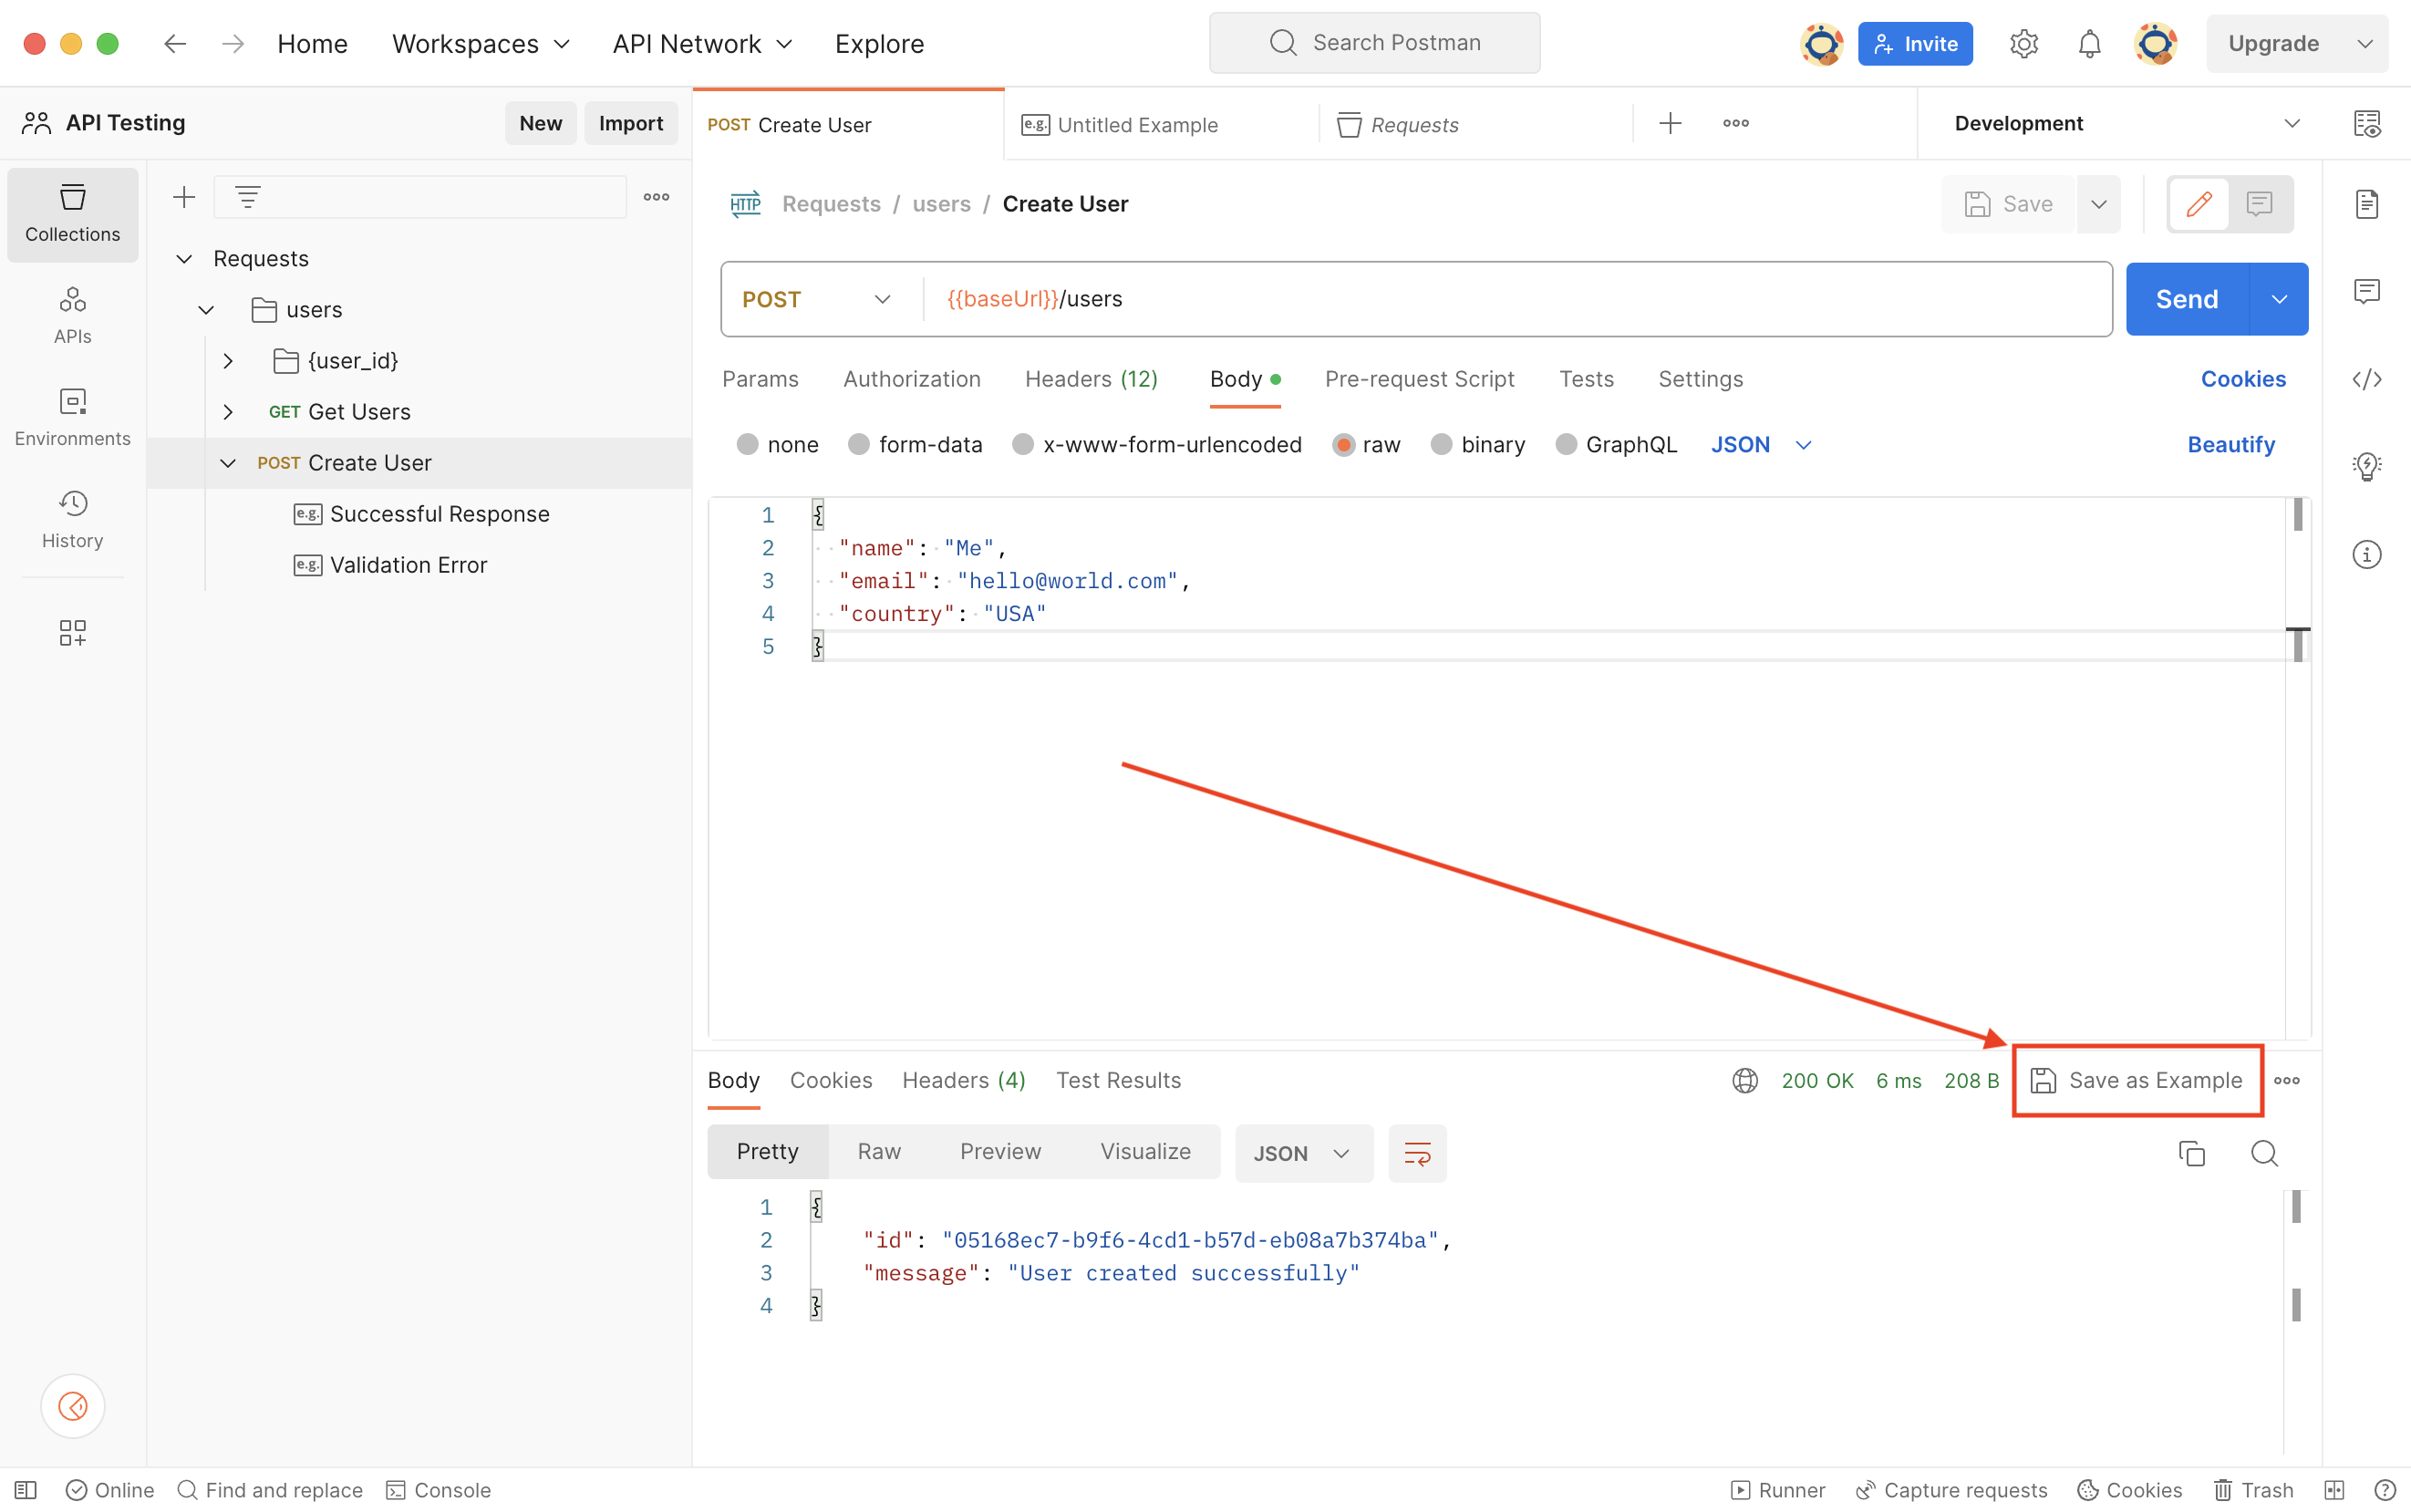
Click "Save as example"
Save the retrieved response as an example in your collection.
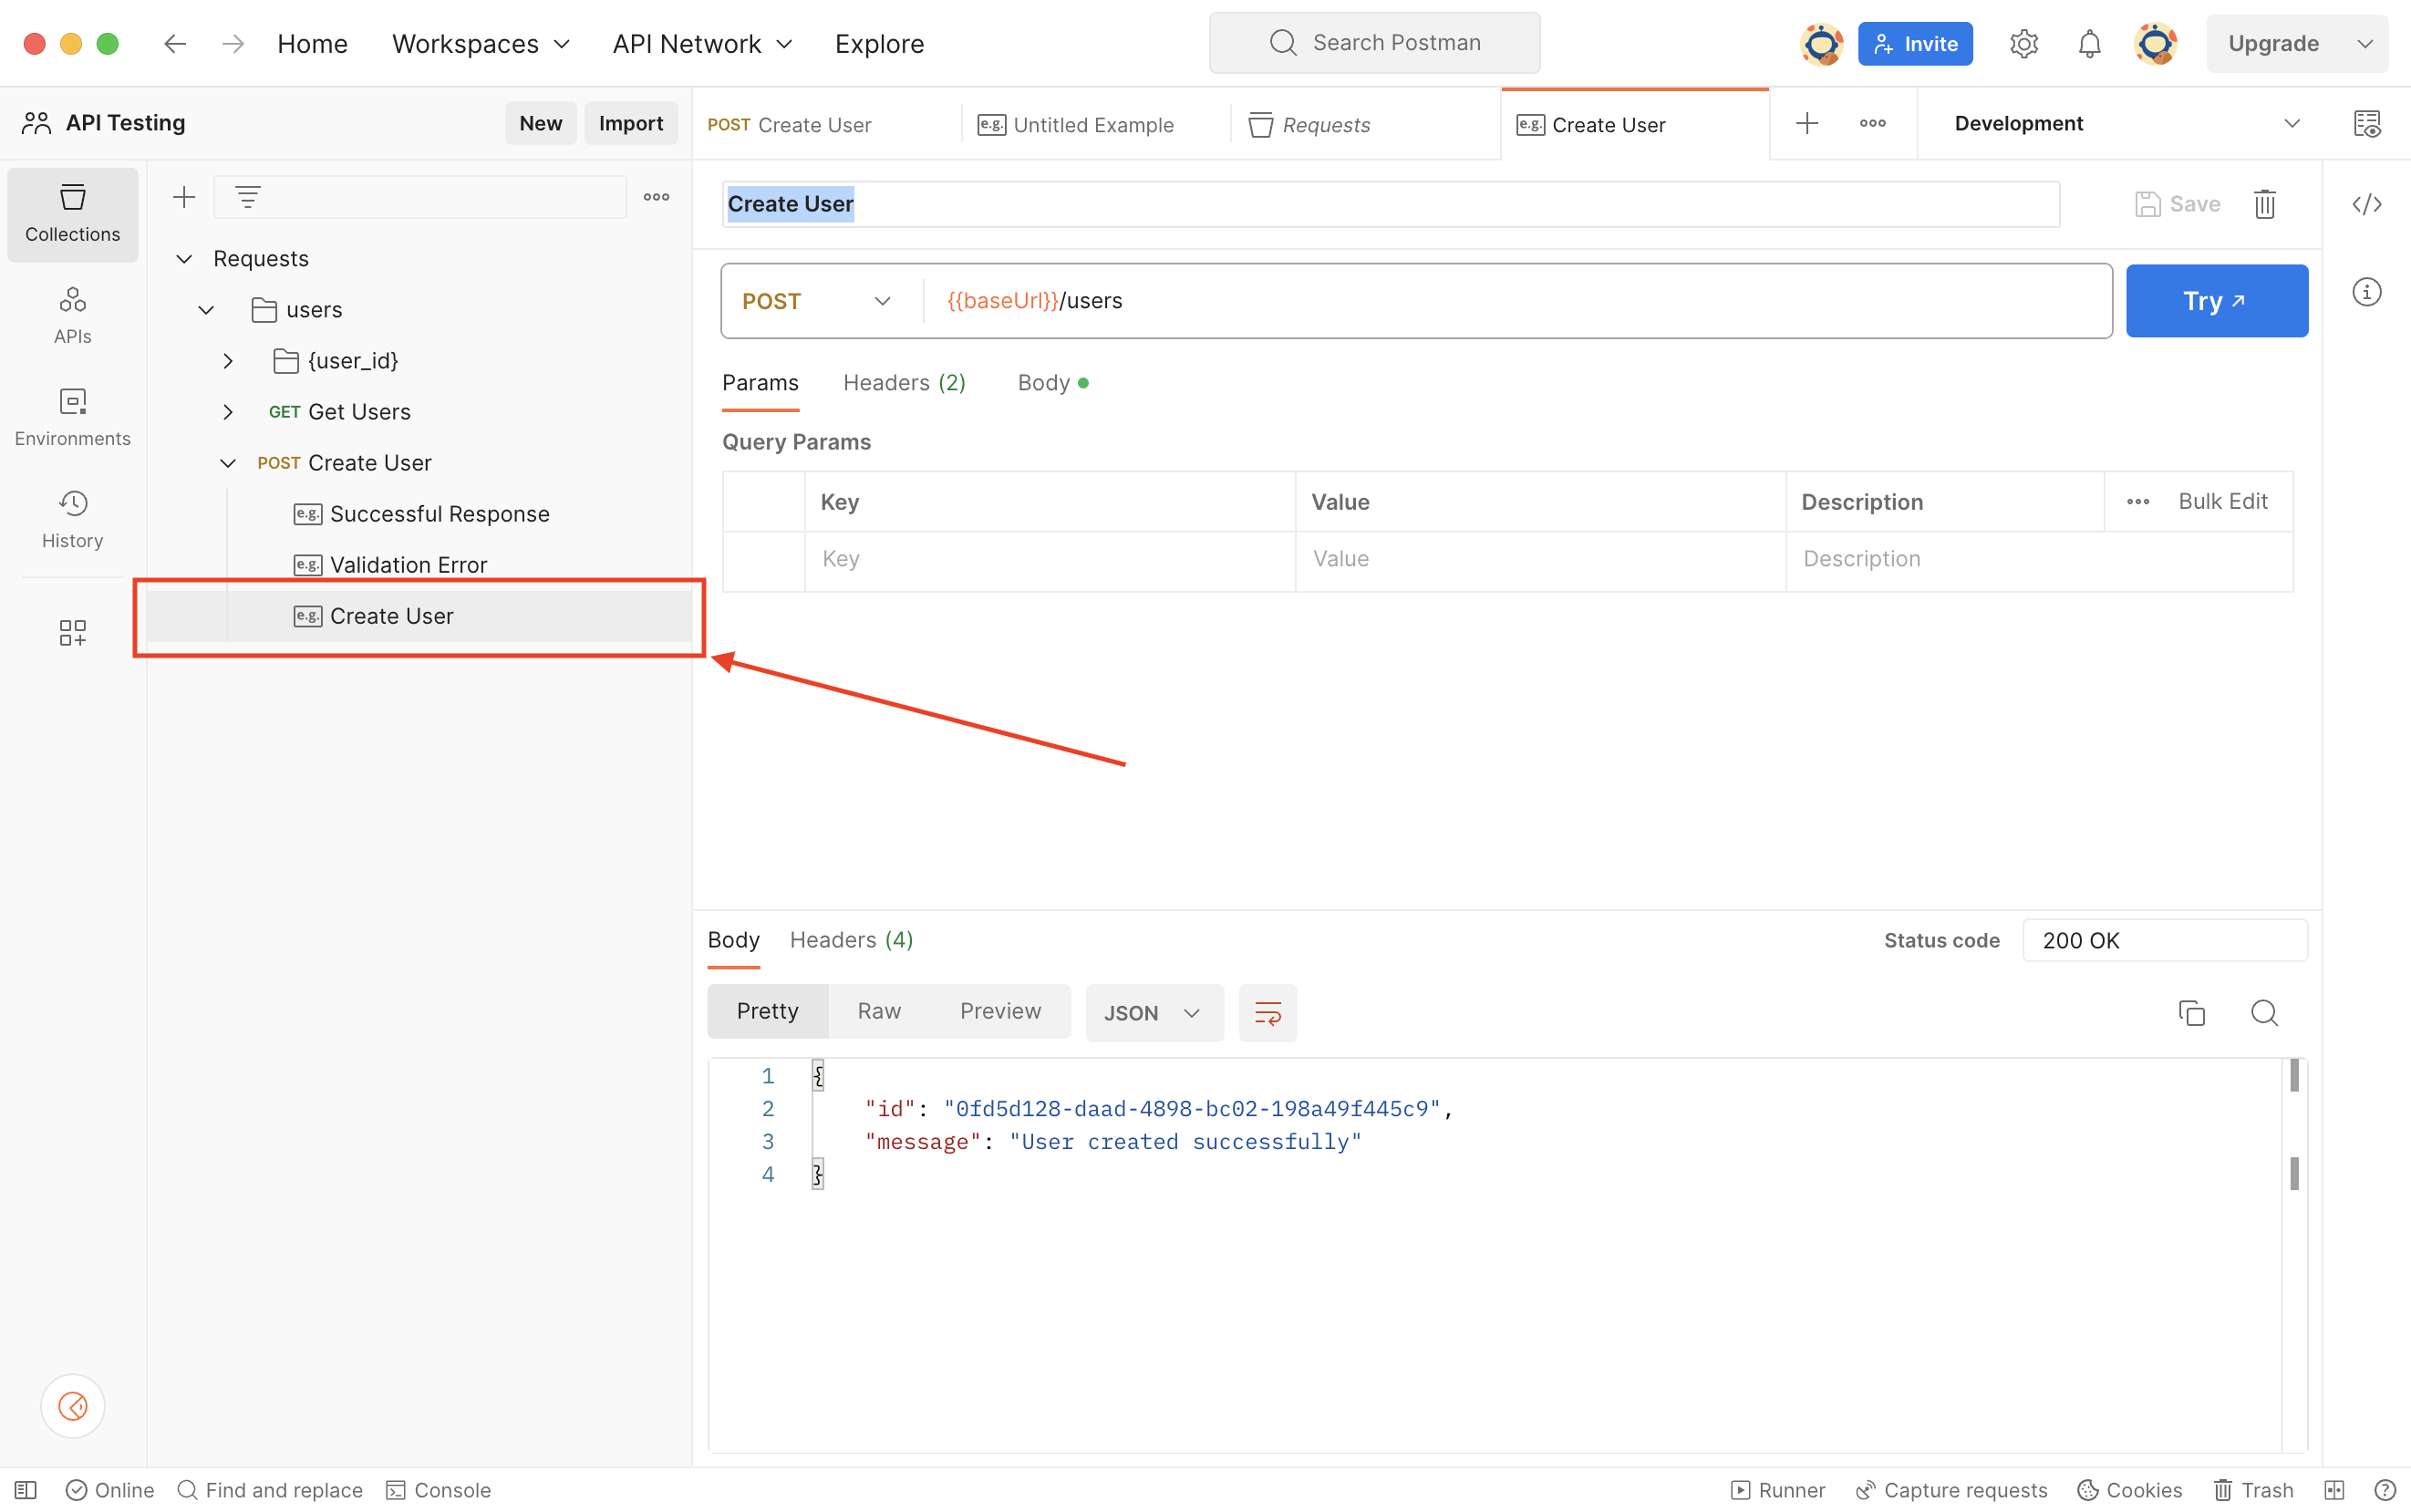
Example should be shown in the menu
You should see a list of examples saved in the left-side menu. Repeat this process for all your operations with as many examples as possible.
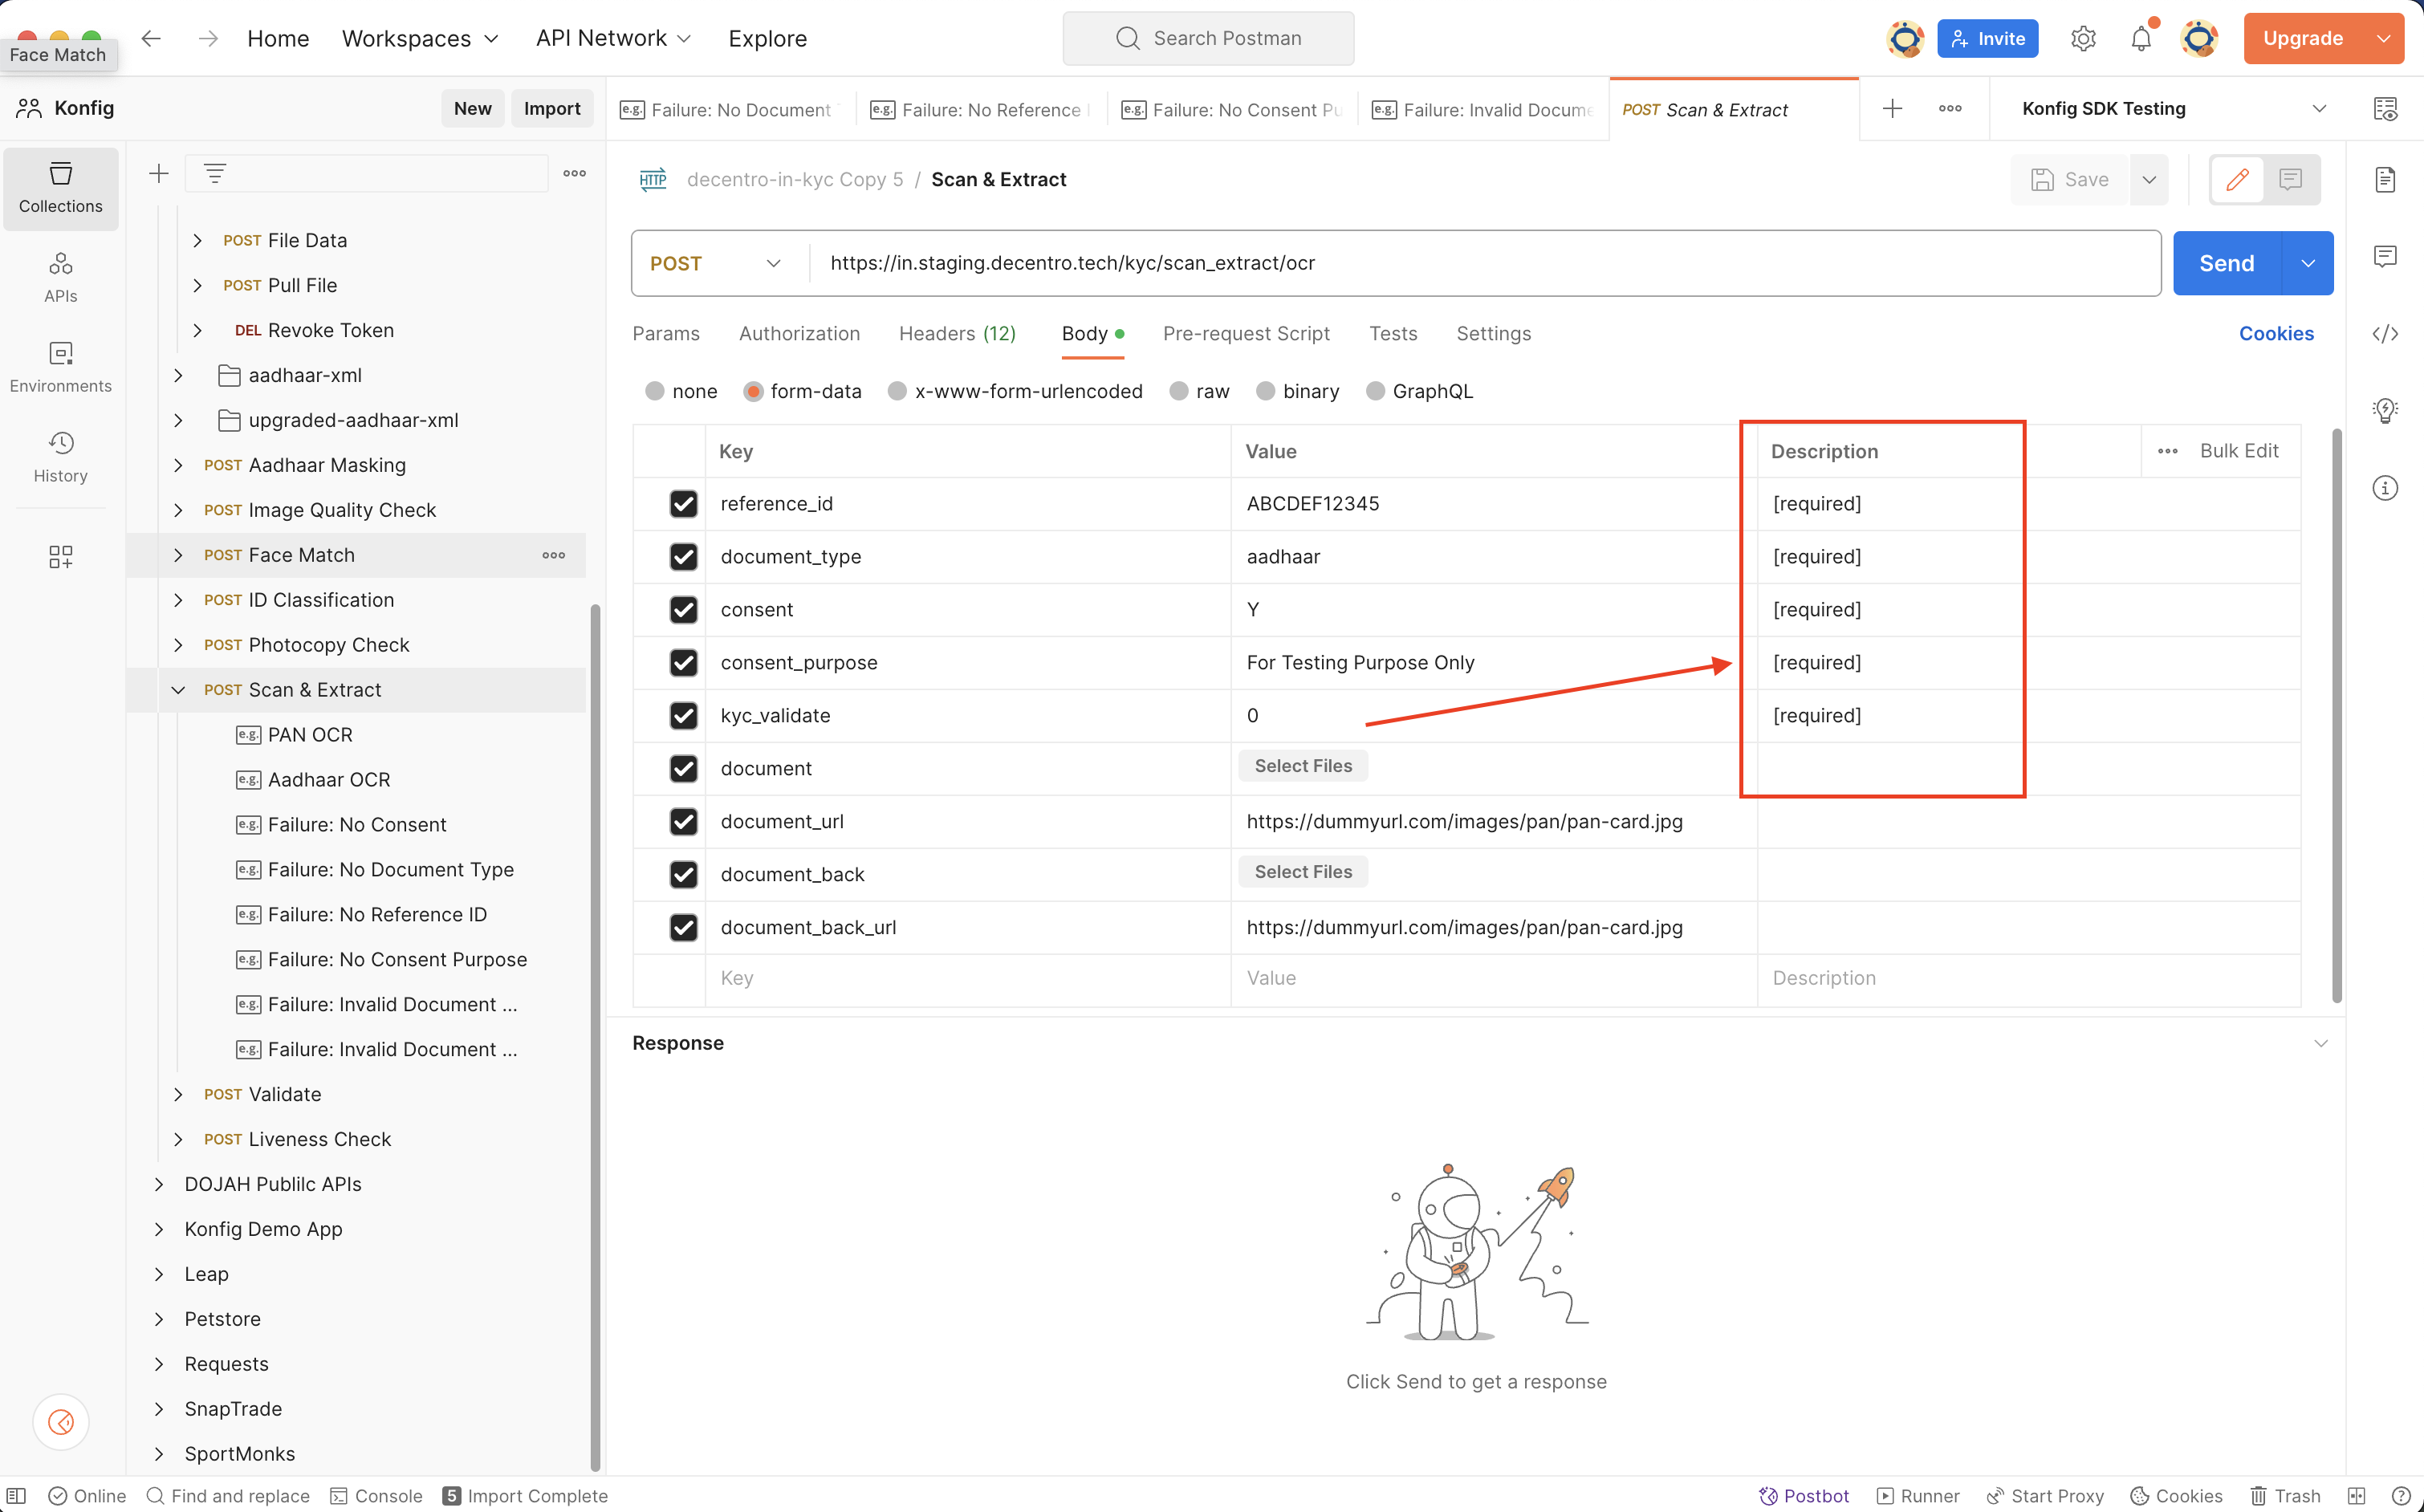
Add [required] to description of required parameters
For any required parameters, add [required] to the description. This will
ensure that the SDKs will throw an error if the required parameter is not
provided.
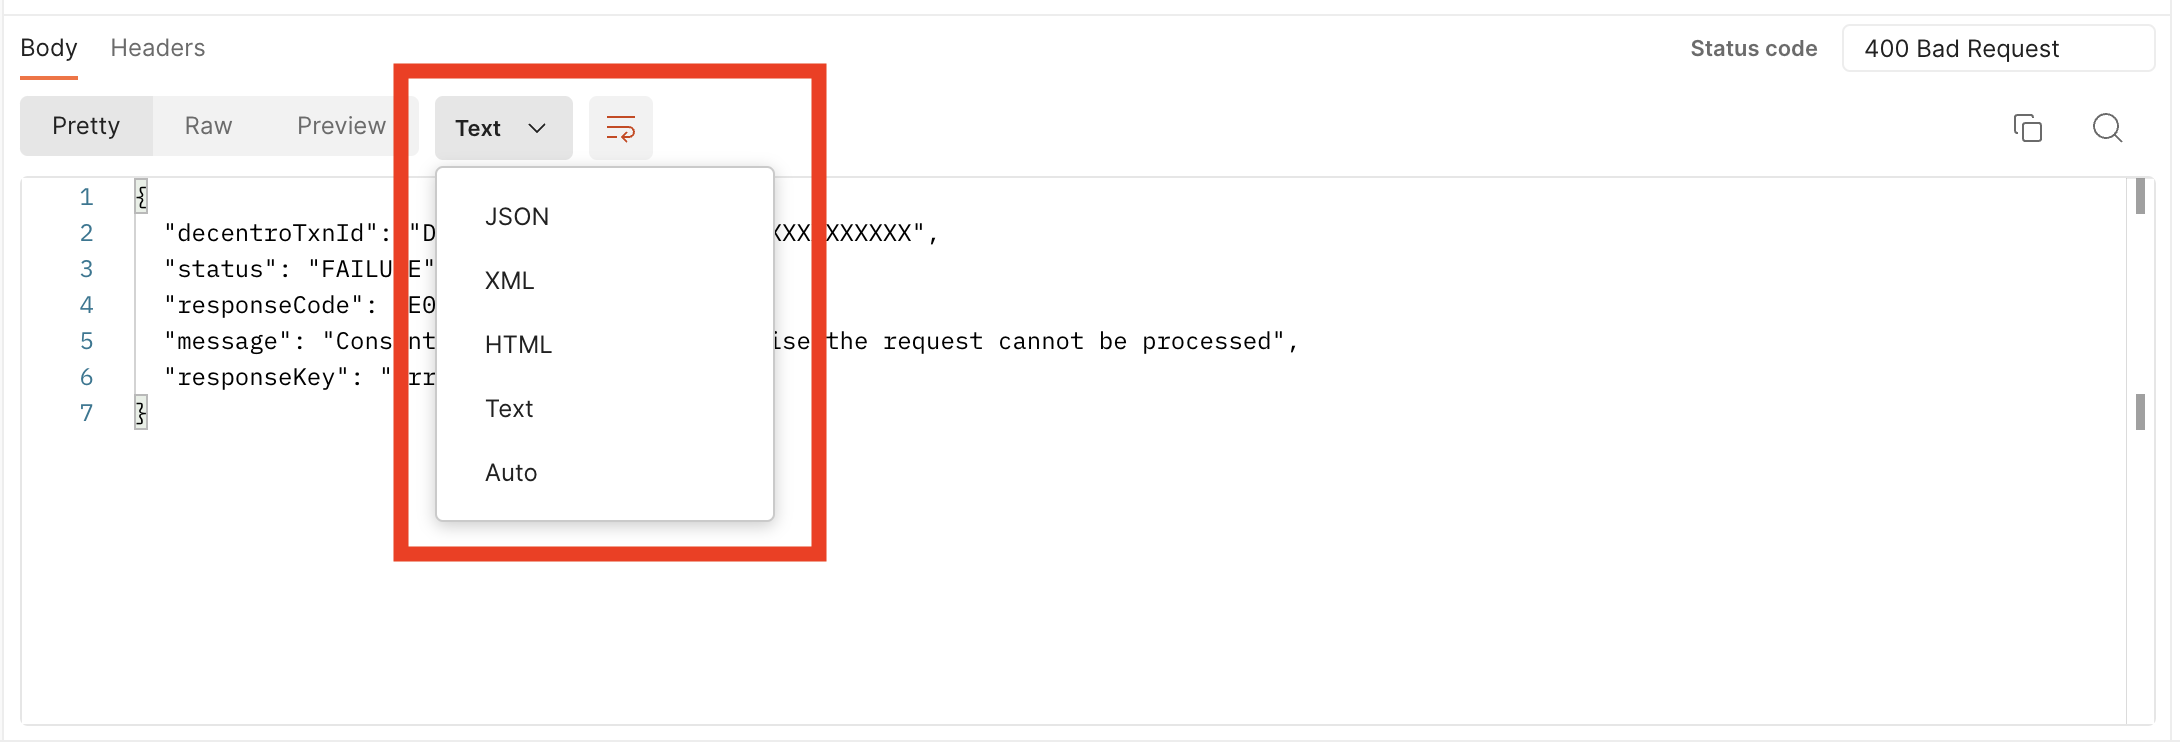
Set preview language of response body
Set the preview language of the response body to JSON or Text to ensure that
the response body schema type is inferred correctly in the generated SDKs. If
you want a raw string to be returned from your endpoint then thoose Text. If
you want the response body to be inferred an "object" type schema, then choose
JSON.
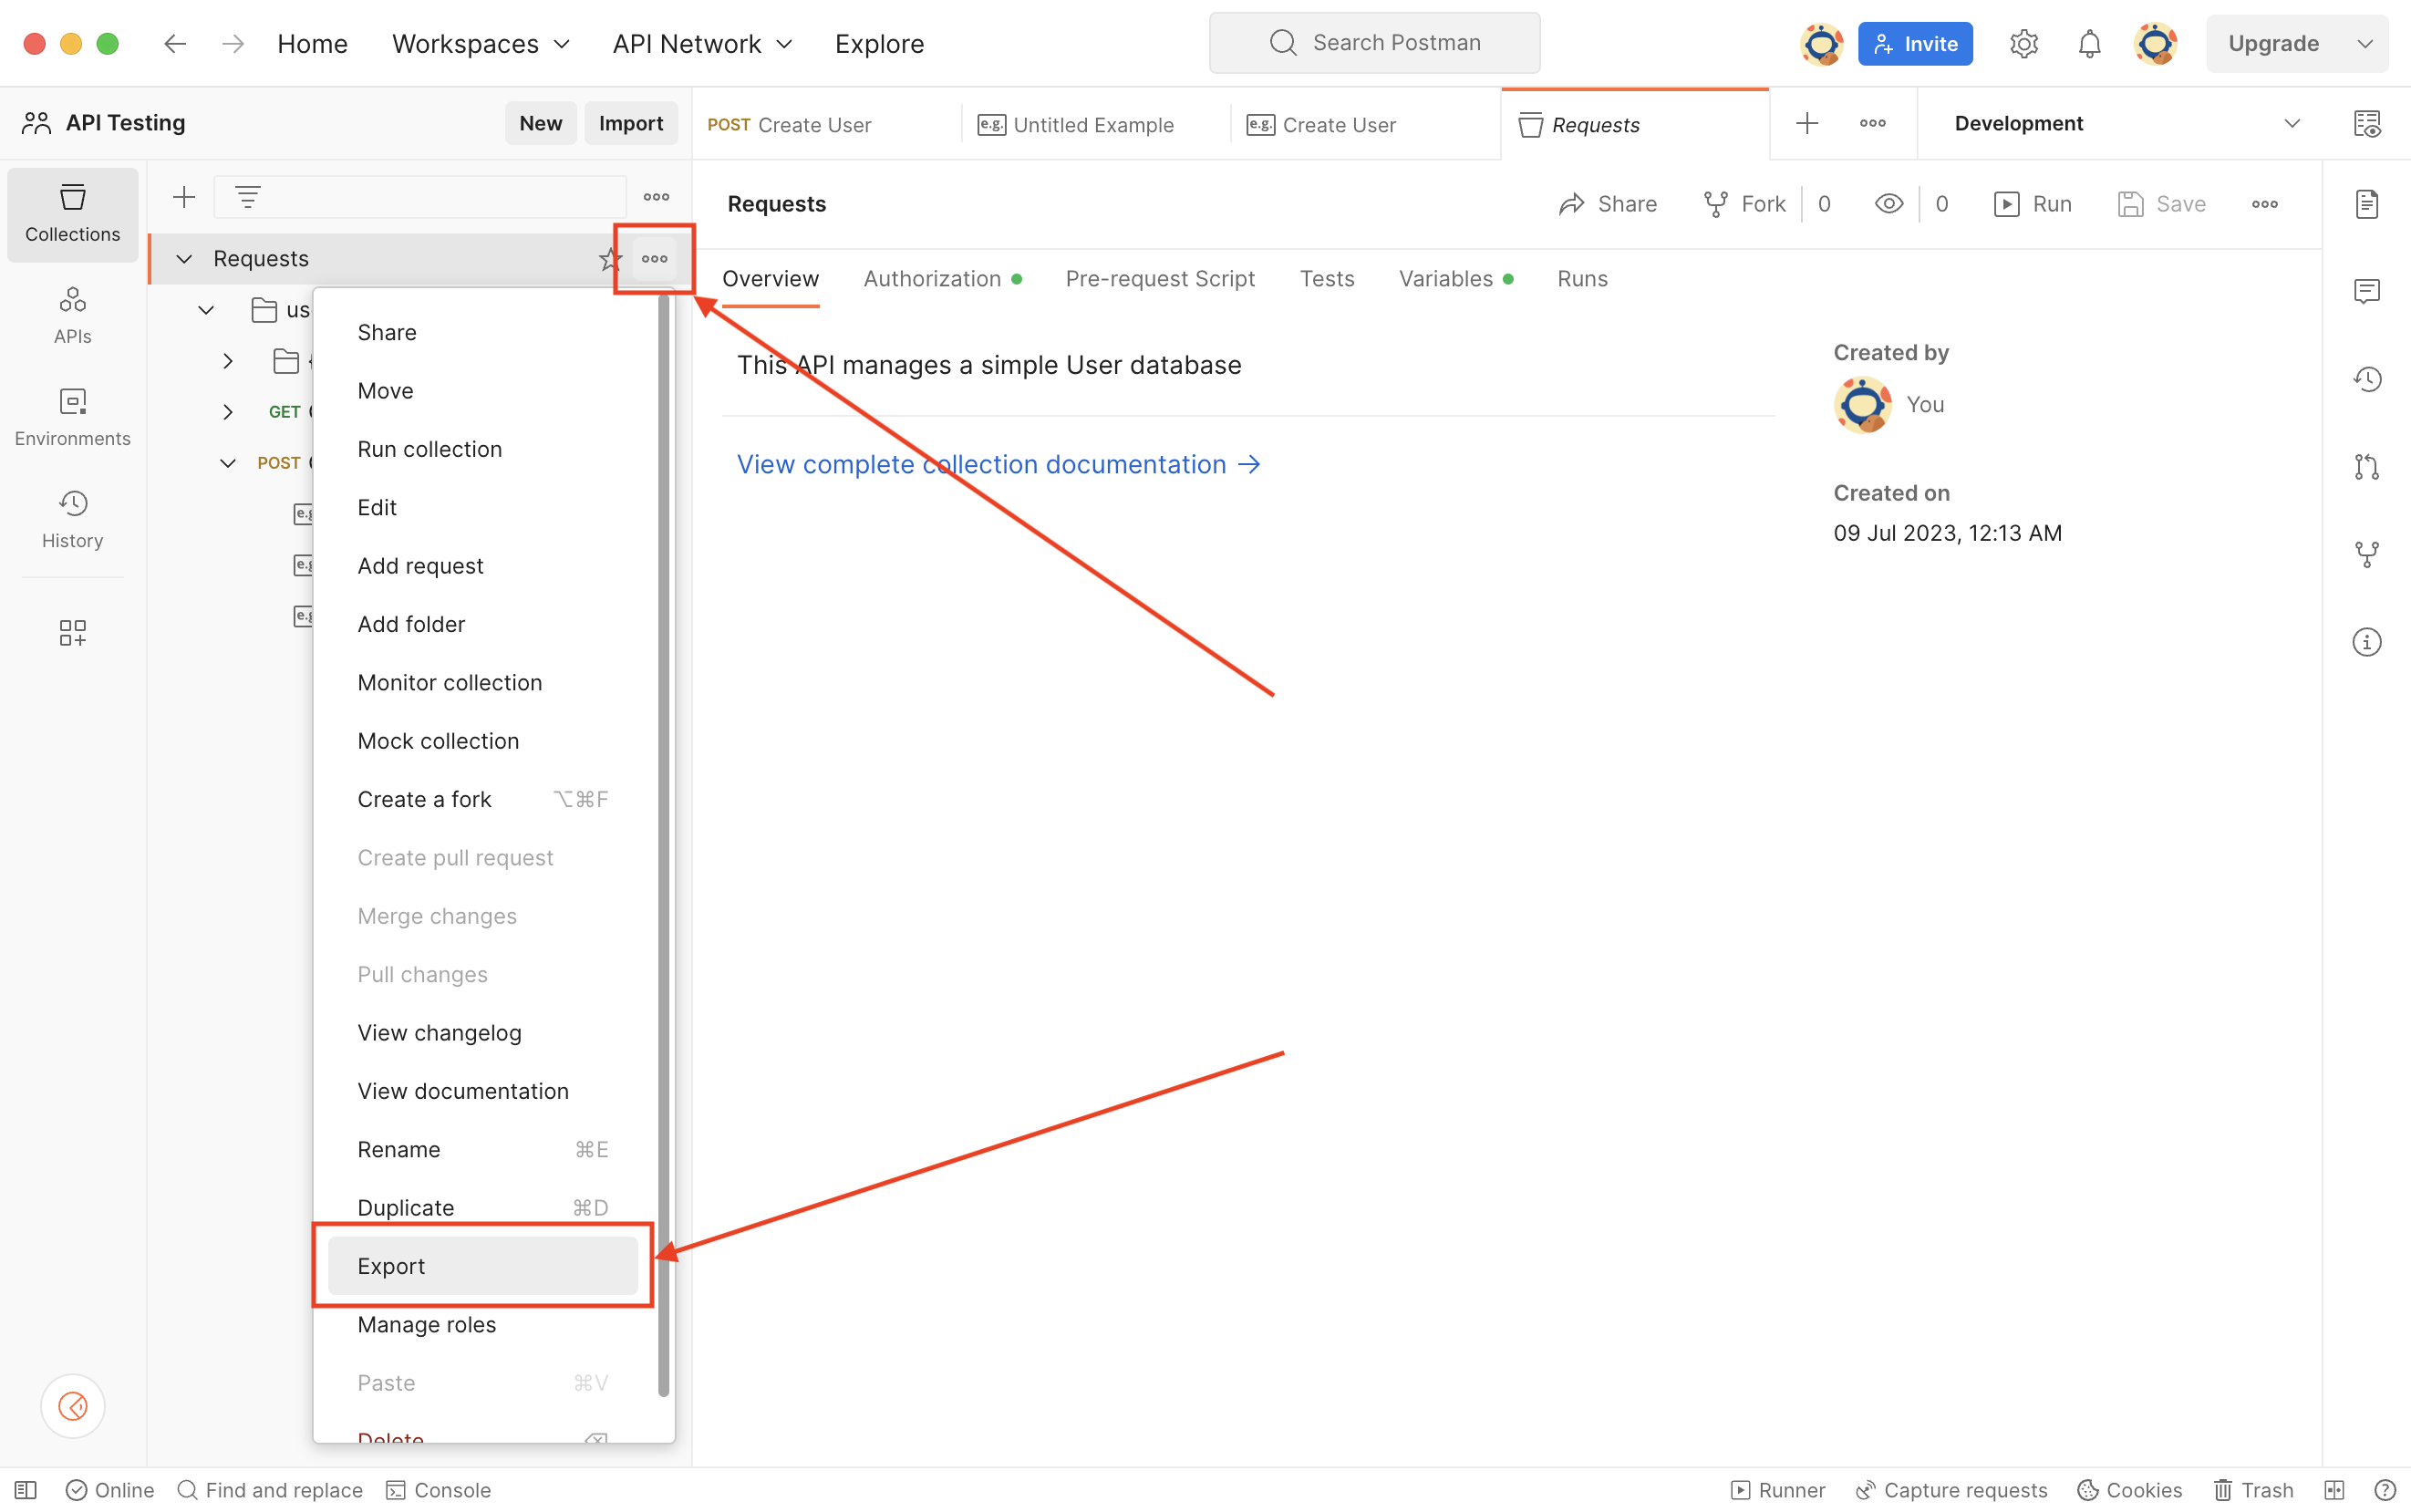
Export Postman Collection
Click the  button on your Postman Collection and click "export":
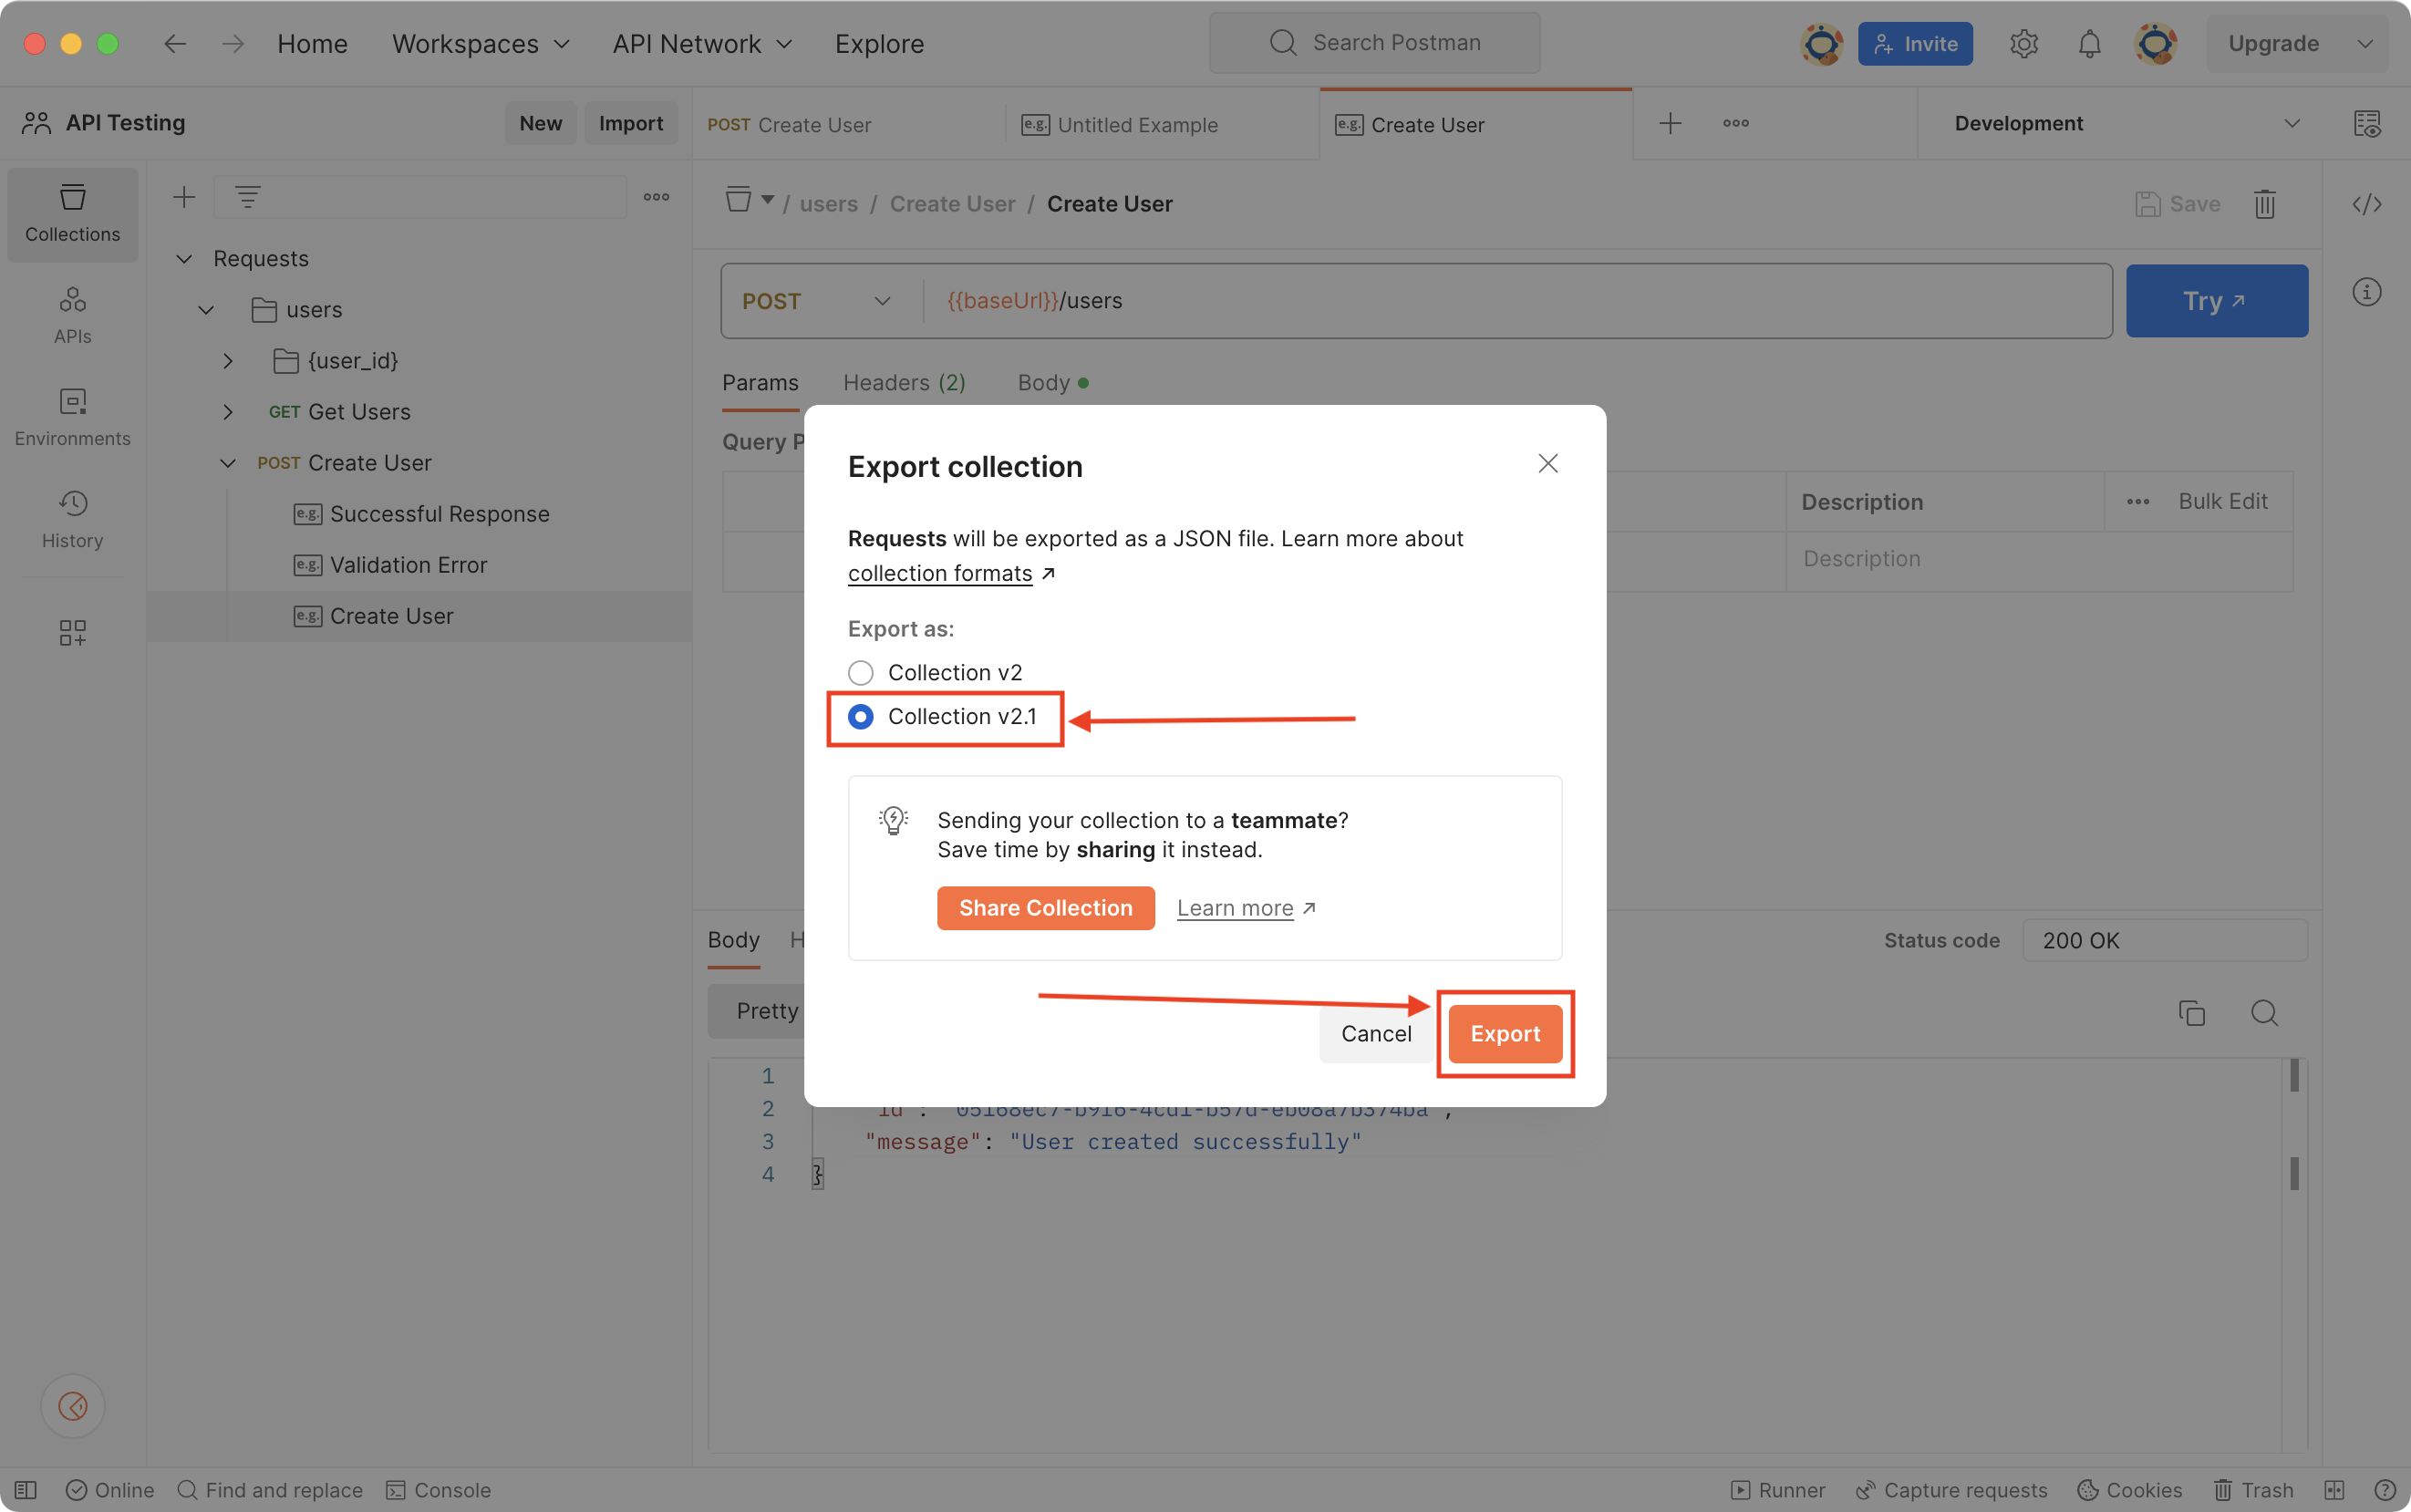
Choose Collection v2.1 and click Export.
Initialize SDK directory
Move the exported Postman Collection to the SDK directory
Copy your exported Postman Collection to your SDK directory.
Convert your Postman Collection to an OpenAPI Specification
Use Konfig's p2o
command to convert your Postman Collection to an OpenAPI
Specification .yaml file.
Run konfig init
Use Konfig's init
command to create your konfig.yaml file.
_10konfig init
Konfig will download the necessary setup files and ask a series of questions to
fill in your konfig.yaml file. When asked what languages to generate, select
Java, Python, and TypeScript for this tutorial.
Once finished, you will see a bunch of files automatically added to your directory.
_14tree -a_14._14├── .konfig_14│ ├── ruleset-version_14│ └── ruleset.js_14├── .spectral.yaml_14├── .vscode_14│ ├── extensions.json_14│ └── settings.json_14├── Requests.postman_collection.json_14├── api.yaml_14└── konfig.yaml_14_142 directories, 8 files
The konfig.yaml file includes all the necessary configurations to generate SDKs for your Postman Collection. You can read more about the schema of konfig.yaml here.
Create high-quality OAS
Use the fix command to
create a high-quality OAS. This will override your OAS with a new version that
is prepared for generating high-quality SDKs.
You will be asked a series of questions regarding what to name particular operations and how to group them.
Generate SDKs
Run konfig generate to generate SDKs.
_10konfig generate
You will see the following output when generating SDKs.
It can take a few minutes to finish generating SDKs.
_14Output directory set to: /tmp/konfig-sdks-out_14Generating java, python, typescript SDKs... done_14Downloading 3 SDKs... done_14Deleting output directory... done_14Creating output directory... done_14Extracting SDKs... done_14Deleting contents of existing directory "java"... done_14Copying Java SDK to "java"... done_14Deleting contents of existing directory "python"... done_14Copying Python SDK to "python"... done_14Deleting contents of existing directory "typescript"... done_14Copying Typescript SDK to "typescript"... done_14Generating top-level README.md... done_14Writing top-level LICENSE... done
Once finished, you should see three SDKs added to your directory.
Example Output
You can explore the example output of this tutorial here: https://github.com/konfig-dev/postman-getting-started-sdks.
Next Steps
To update your SDKs simply repeat the steps from export to generation.
Konfig's SDKs are highly customizable in case you need to add to your SDKs. Once you are finished developing your SDKs, you can also test, publish, and automate your entire SDK workflow with Konfig.