
Originally started as a side project, Postman has become one of the best tools for collaboratively building APIs with over 1.29 billion requests created in the past year.
As organizations' investments of time and resources into APIs increase, API-first organizations must leverage testing tools like Postman. Adopting an API tool is an effective way to save thousands of engineering hours.
There are alternatives to Postman like Insomnia and Paw but Postman is still the most widely used tool by a long margin.
Today enterprises like Salesforce and WhatsApp use Postman to document their API and engineers are using Postman to run 2,700+ tests on 100's of APIs on every deployment. At Konfig, we frequently use Postman to test APIs. So we created a guide on the fundamentals of documenting and testing your API with Postman. In this guide, we cover the basics of Postman and its benefits. We also give our hottest tips for improving your Postman workflow.
Setup
Goes without being said but you should probably have the Postman app downloaded here so you can follow along. There is a web client for Postman but we suggest downloading the desktop application because it makes the application easily accessible and keeps you from burying Postman in a sea of browser tabs.
Example API [Optional]
If you don't have an API, you can locally run our example API implementation to follow the guide yourself.
Setup Instructions for Example API
The example API is written in Python using the FastAPI framework so we can easily generate an OpenAPI Specification. It includes CRUD operations on a fake User database.
Python 3.7+ and Poetry are required to run the example API. Refer to the documentation for installation instructions on your system.
To set up the example API run the following script.
_10git clone https://github.com/konfig-dev/fastapi-example_10cd fastapi-example_10./start.sh
The example API has 5 operations.
GETList Users - returns a list of usersGETGet User - returns the details of a user by IDPOSTCreate User - inserts a user into the databasePUTUpdate User - updates a user in the databaseDELETEDelete User - removes a user from the database
Postman Fundamentals
Postman's functionality revolves around the concept of a Collection.
According to Postman:
Postman Collections are a group of saved requests. Every request you send in Postman appears under the History tab of the sidebar. On a small scale, reusing requests through the history section is convenient. As your Postman usage grows, it can be time-consuming to find a particular request in your history. Instead of scrolling through your history section, you can save all your requests as a group for easier access.
We feel this description doesn't do justice to Collections. Collections are more than just a place to store saved requests and history. Collections enable Postman to build all the powerful automation features we will cover in this guide.
Workspace
Collections live under a Workspace. A workspace is a place for your team to collaborate and easily manage granular permissions. Workspaces also house other features such as Environments and API definitions like OpenAPI Specification or GraphQL.
To create a Workspace, follow the demonstration below.
- Create a Workspace
- Give it a name and summary and click "Create Workspace"
- Invite a team member [optional]
Collection
On the surface, a Collection is a group of saved HTTP requests that makes it easy to navigate and locate example requests for a specific endpoint. But as you will see in this guide, Collections are truly at the core of Postman's standout feature set.
Organization
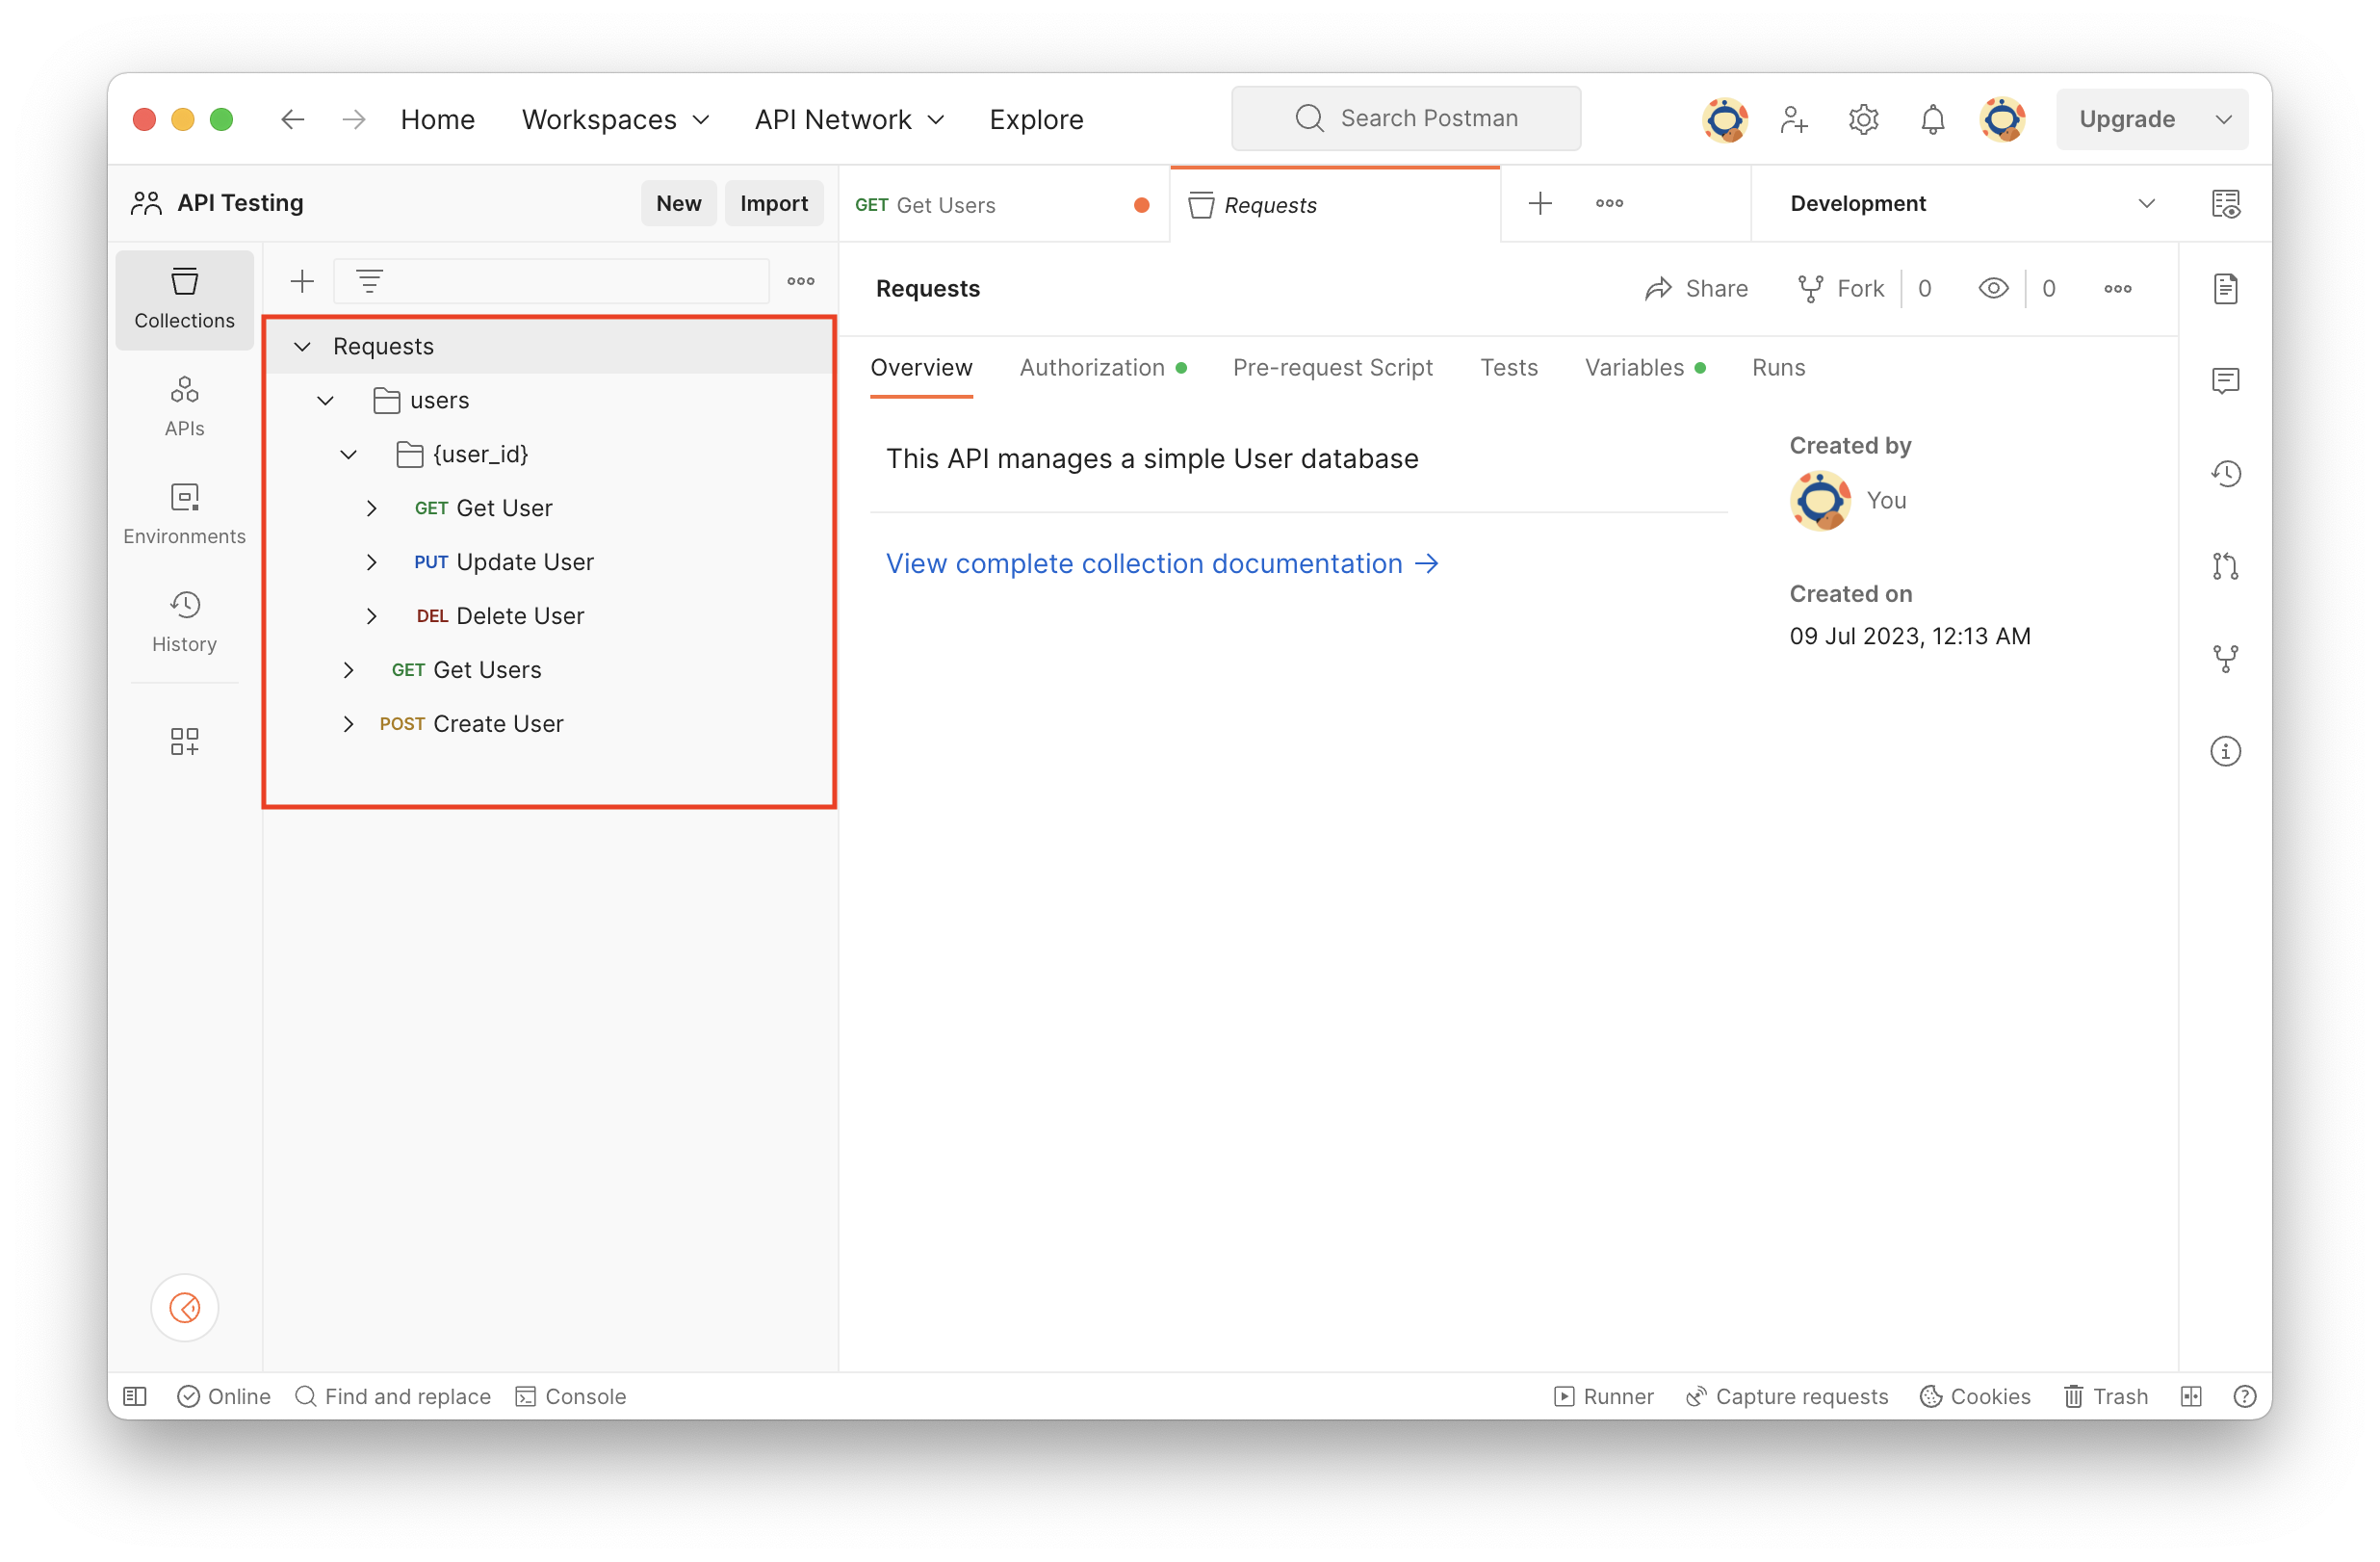
Postman brings structure to the chaos of API development by prescribing a robust data model for organizing requests. By containing all the nitty gritty details of API requests into neatly structured request templates, grokking an API becomes 10x easier.
Collaboration
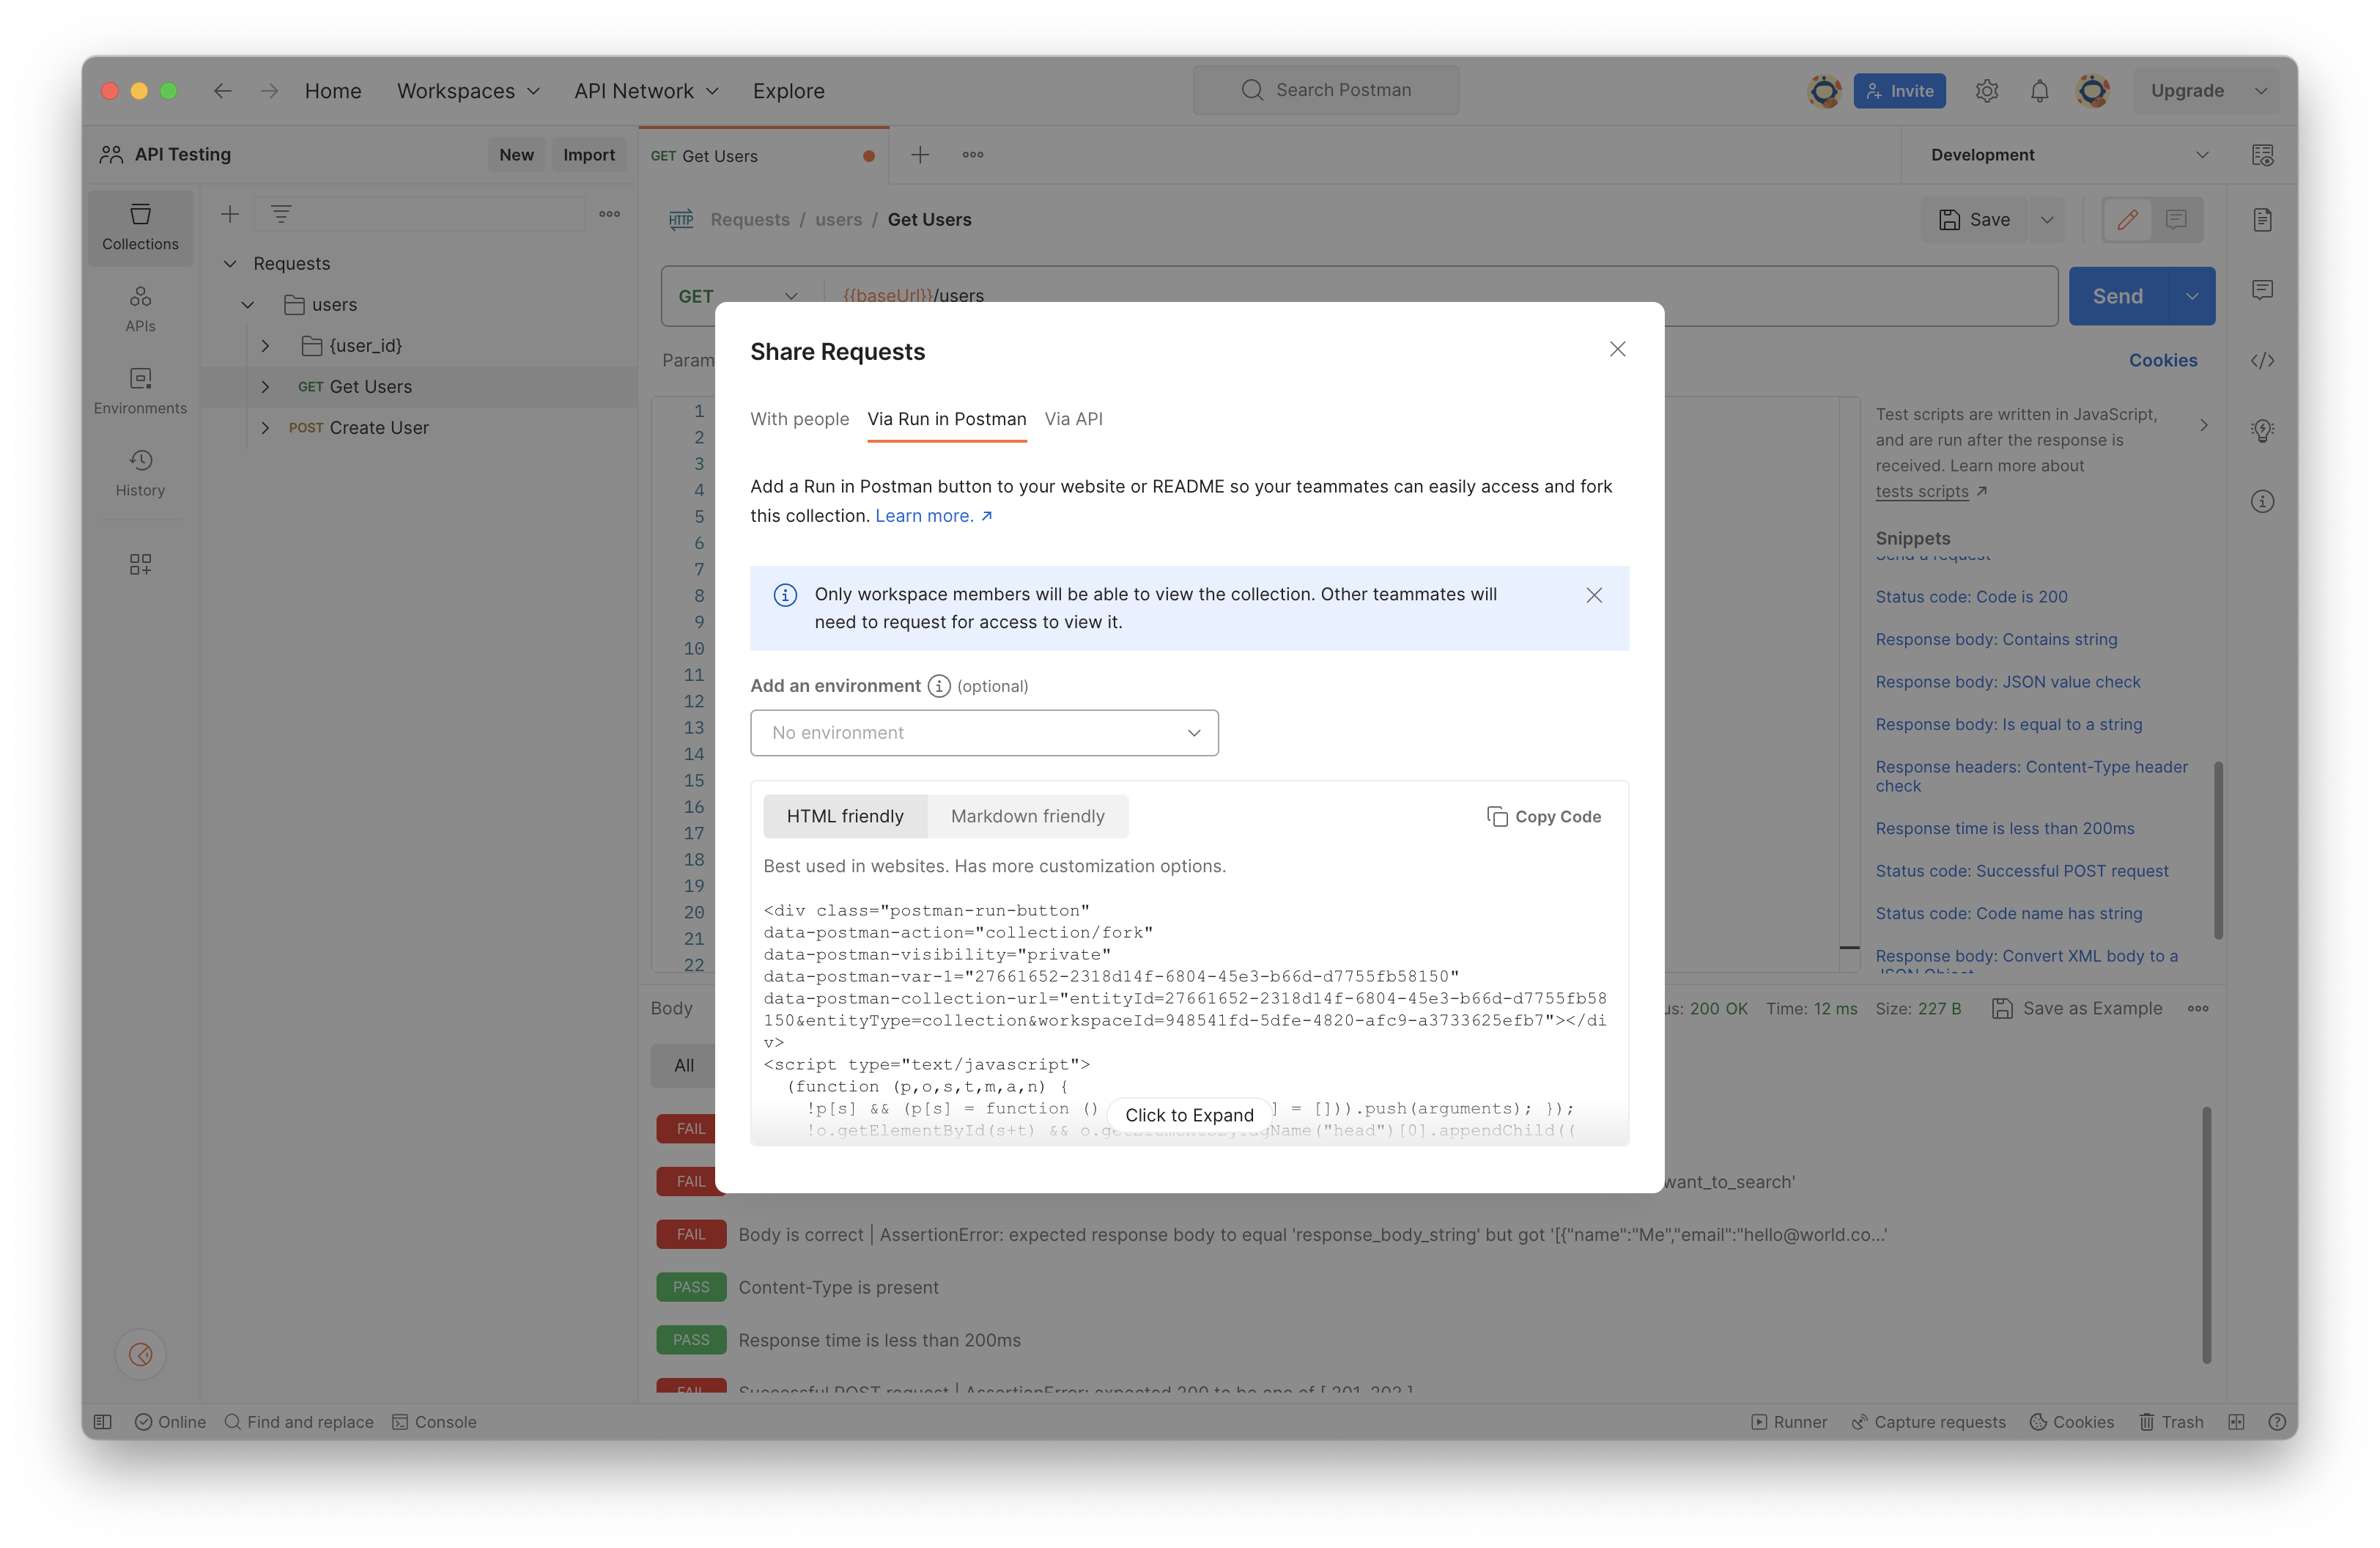
Collections make it easy to collaborate on API development and integration. Collections can be shared publicly for third-party developers to integrate your API or privately among your teammates to collaborate on internal API development. Collections are also forkable and version controlled allowing developers to simultaneously make changes while avoiding conflicts. Postman's cloud-based architecture also integrates permissions and persistence for your Collections.
Testing
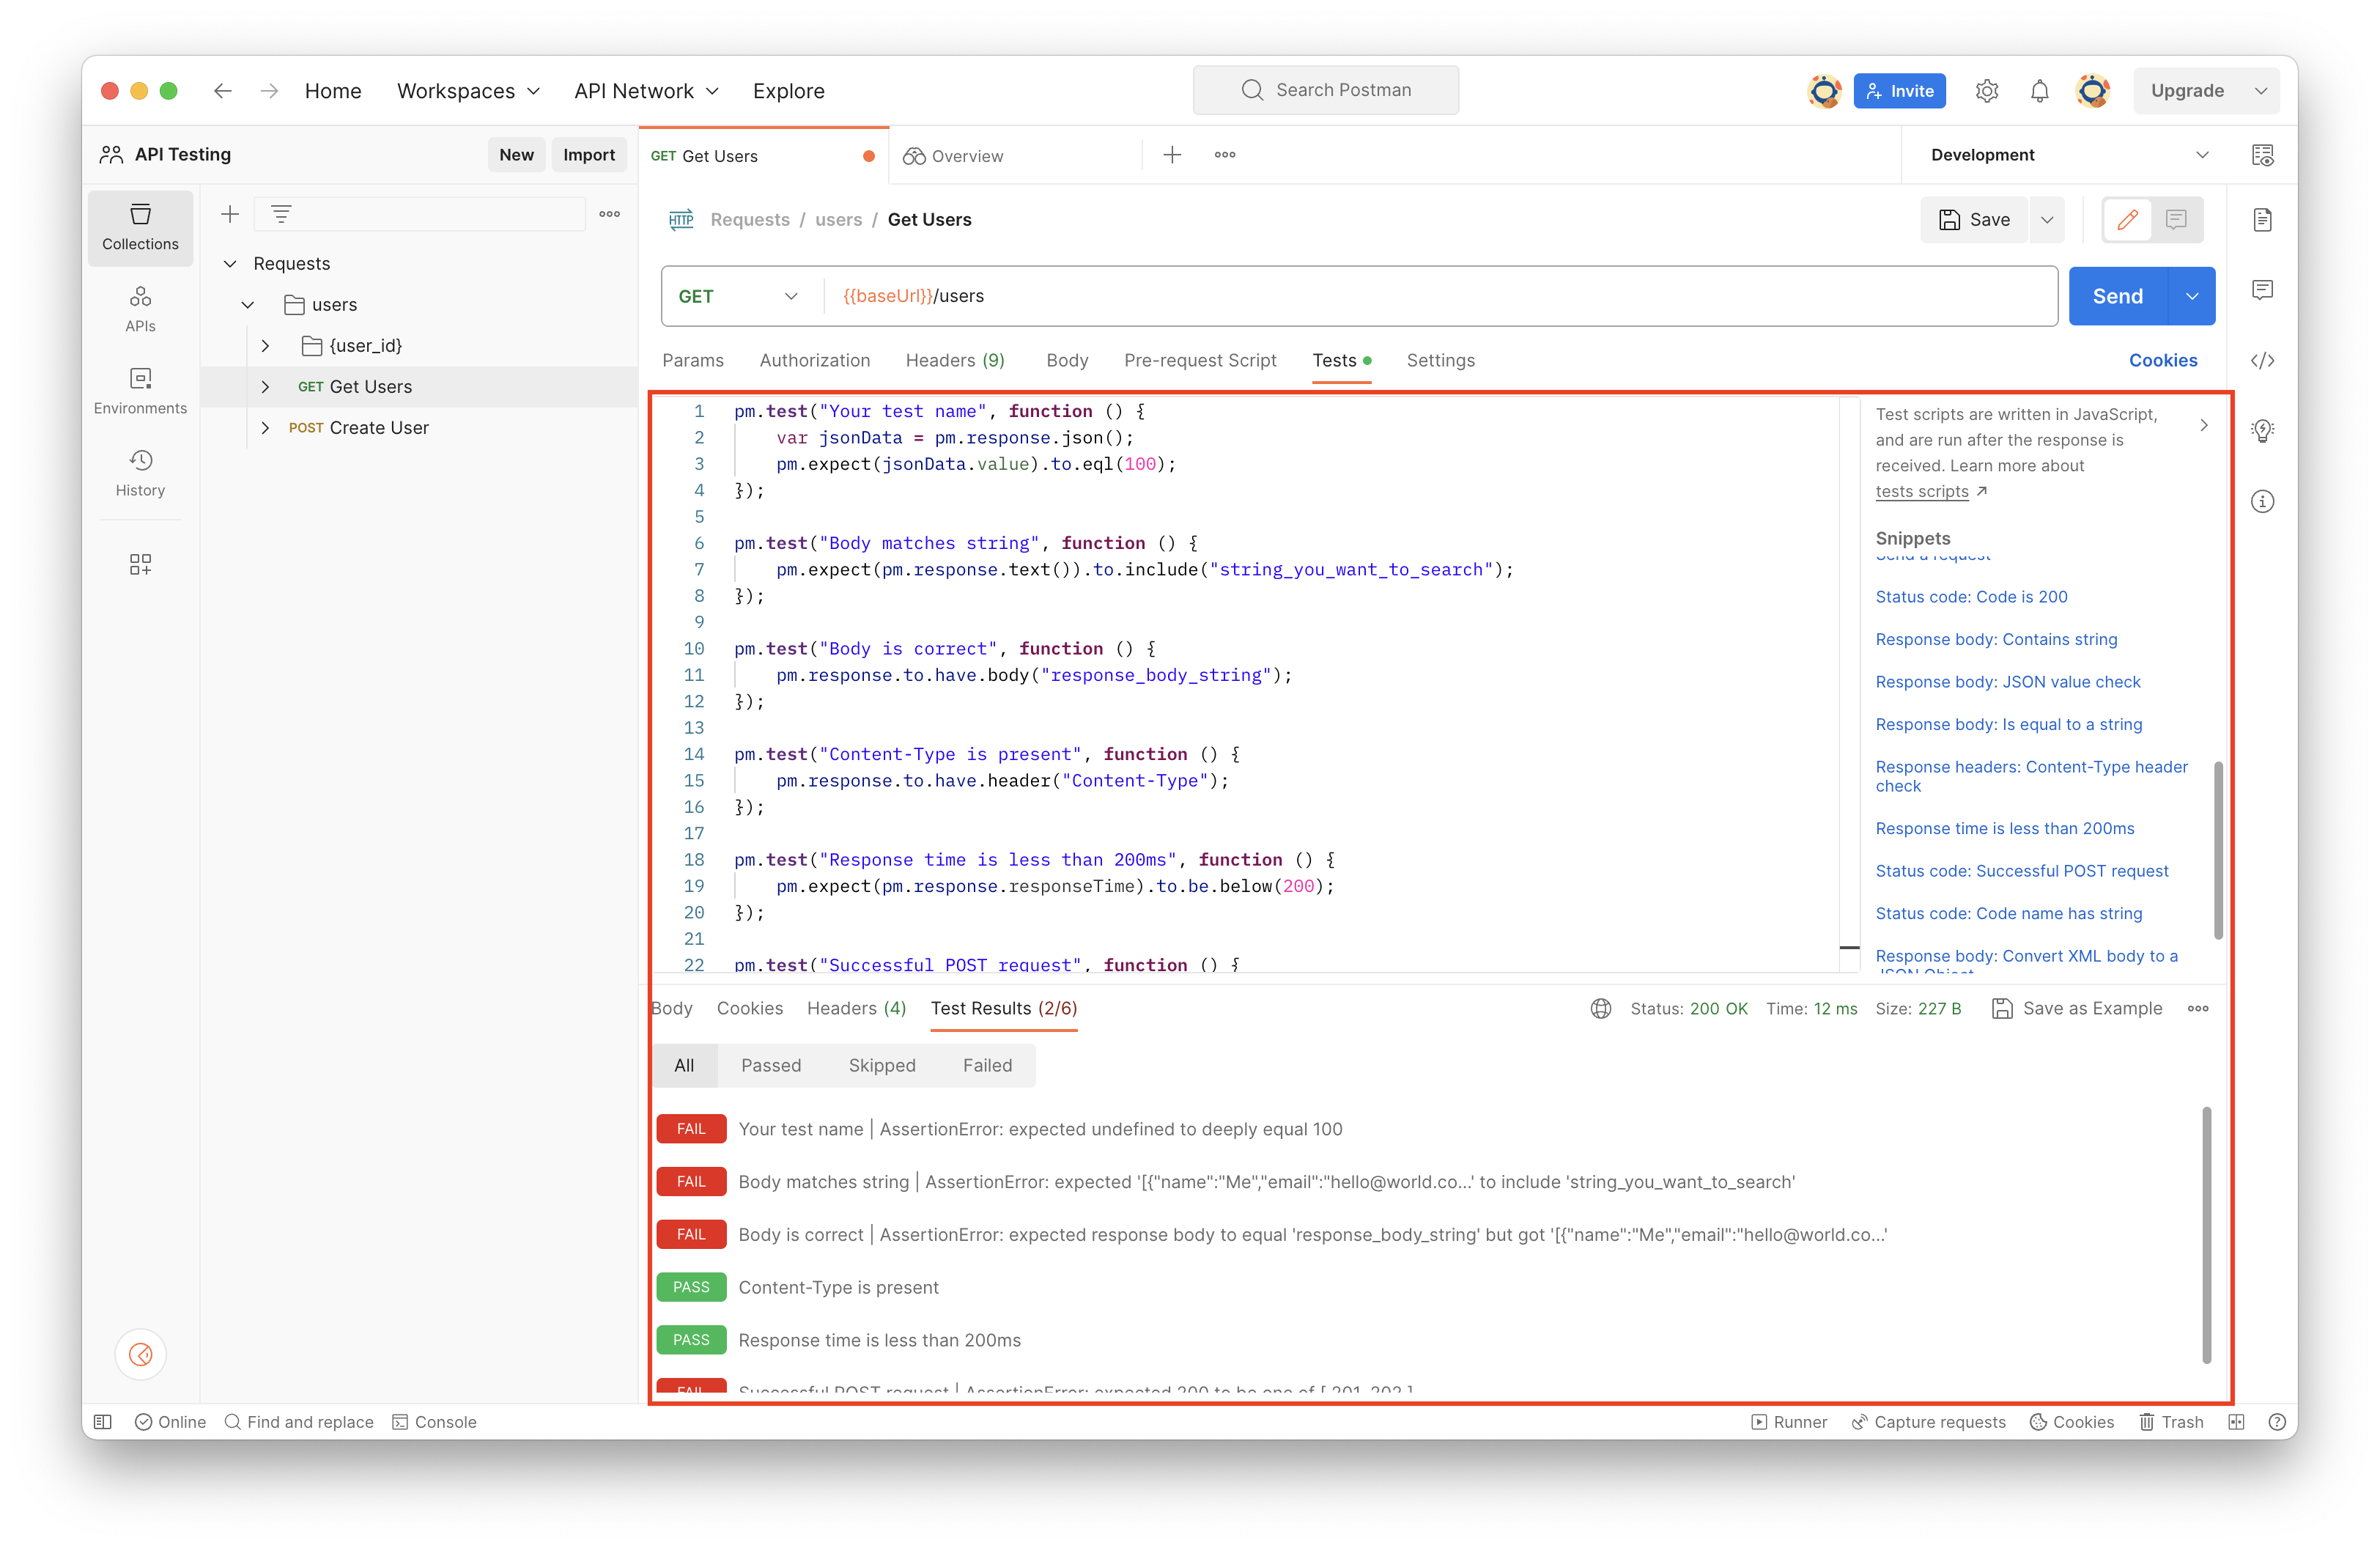
Collections can also be used for building test suites ranging from simple assertions to multi-step request flows. By leveraging JavaScript to validate responses and orchestrate multi-step requests, you can design advanced test suites for your API. Postman Collections can also be integrated with CI/CD tooling to streamline testing and deployment with Newman and Postman API.
Third-party Tooling
Postman Collections follow a standard JSON-based protocol so developers can build third-party tools to enhance Postman's capabilities. You can either export a Postman Collection directly through the UI or dynamically fetch it from the Postman API. This allows tooling like SDK generation and CI/CD pipelines to be tightly integrated with your Postman workflow.
_584{_584 "info": {_584 "_postman_id": "2318d14f-6804-45e3-b66d-d7755fb58150",_584 "name": "Requests",_584 "description": "This API manages a simple User database",_584 "schema": "https://schema.getpostman.com/json/collection/v2.1.0/collection.json",_584 "_exporter_id": "27661652",_584 "_collection_link": "https://universal-trinity-85337.postman.co/workspace/API-Testing~948541fd-5dfe-4820-afc9-a3733625efb7/collection/27661652-2318d14f-6804-45e3-b66d-d7755fb58150?action=share&creator=27661652&source=collection_link"_584 },_584 "item": [_584 {_584 "name": "users",_584 "item": [_584 {_584 "name": "{user_id}",_584 "item": [_584 {_584 "name": "Get User",_584 "request": {_584 "method": "GET",_584 "header": [_584 {_584 "key": "Accept",_584 "value": "application/json"_584 }_584 ],_584 "url": {_584 "raw": "{{baseUrl}}/users/:user_id",_584 "host": ["{{baseUrl}}"],_584 "path": ["users", ":user_id"],_584 "variable": [_584 {_584 "key": "user_id",_584 "value": "{{userId}}"_584 }_584 ]_584 }_584 },_584 "response": [_584 {_584 "name": "Successful Response",_584 "originalRequest": {_584 "method": "GET",_584 "header": [_584 {_584 "key": "Accept",_584 "value": "application/json"_584 },_584 {_584 "description": "Added as a part of security scheme: apikey",_584 "key": "X-API-Key",_584 "value": "<API Key>"_584 }_584 ],_584 "url": {_584 "raw": "{{baseUrl}}/users/:user_id",_584 "host": ["{{baseUrl}}"],_584 "path": ["users", ":user_id"],_584 "variable": [_584 {_584 "key": "user_id"_584 }_584 ]_584 }_584 },_584 "status": "OK",_584 "code": 200,_584 "_postman_previewlanguage": "json",_584 "header": [_584 {_584 "key": "Content-Type",_584 "value": "application/json"_584 }_584 ],_584 "cookie": [],_584 "body": "{}"_584 },_584 {_584 "name": "Validation Error",_584 "originalRequest": {_584 "method": "GET",_584 "header": [_584 {_584 "key": "Accept",_584 "value": "application/json"_584 },_584 {_584 "description": "Added as a part of security scheme: apikey",_584 "key": "X-API-Key",_584 "value": "<API Key>"_584 }_584 ],_584 "url": {_584 "raw": "{{baseUrl}}/users/:user_id",_584 "host": ["{{baseUrl}}"],_584 "path": ["users", ":user_id"],_584 "variable": [_584 {_584 "key": "user_id"_584 }_584 ]_584 }_584 },_584 "status": "Unprocessable Entity (WebDAV) (RFC 4918)",_584 "code": 422,_584 "_postman_previewlanguage": "json",_584 "header": [_584 {_584 "key": "Content-Type",_584 "value": "application/json"_584 }_584 ],_584 "cookie": [],_584 "body": "{\n \"detail\": [\n {\n \"loc\": [\n \"<string>\",\n \"<string>\"\n ],\n \"msg\": \"<string>\",\n \"type\": \"<string>\"\n },\n {\n \"loc\": [\n \"<string>\",\n \"<string>\"\n ],\n \"msg\": \"<string>\",\n \"type\": \"<string>\"\n }\n ]\n}"_584 }_584 ]_584 },_584 {_584 "name": "Update User",_584 "request": {_584 "method": "PUT",_584 "header": [_584 {_584 "key": "Content-Type",_584 "value": "application/json"_584 },_584 {_584 "key": "Accept",_584 "value": "application/json"_584 }_584 ],_584 "body": {_584 "mode": "raw",_584 "raw": "{\n \"name\": \"<string>\",\n \"email\": \"<string>\",\n \"country\": \"{{country}}\"\n}",_584 "options": {_584 "raw": {_584 "headerFamily": "json",_584 "language": "json"_584 }_584 }_584 },_584 "url": {_584 "raw": "{{baseUrl}}/users/:user_id",_584 "host": ["{{baseUrl}}"],_584 "path": ["users", ":user_id"],_584 "variable": [_584 {_584 "key": "user_id",_584 "value": "<uuid>"_584 }_584 ]_584 }_584 },_584 "response": [_584 {_584 "name": "Successful Response",_584 "originalRequest": {_584 "method": "PUT",_584 "header": [_584 {_584 "key": "Content-Type",_584 "value": "application/json"_584 },_584 {_584 "key": "Accept",_584 "value": "application/json"_584 },_584 {_584 "description": "Added as a part of security scheme: apikey",_584 "key": "X-API-Key",_584 "value": "<API Key>"_584 }_584 ],_584 "body": {_584 "mode": "raw",_584 "raw": "{\n \"name\": \"<string>\",\n \"email\": \"<string>\",\n \"country\": \"<string>\"\n}",_584 "options": {_584 "raw": {_584 "headerFamily": "json",_584 "language": "json"_584 }_584 }_584 },_584 "url": {_584 "raw": "{{baseUrl}}/users/:user_id",_584 "host": ["{{baseUrl}}"],_584 "path": ["users", ":user_id"],_584 "variable": [_584 {_584 "key": "user_id"_584 }_584 ]_584 }_584 },_584 "status": "OK",_584 "code": 200,_584 "_postman_previewlanguage": "json",_584 "header": [_584 {_584 "key": "Content-Type",_584 "value": "application/json"_584 }_584 ],_584 "cookie": [],_584 "body": "{}"_584 },_584 {_584 "name": "Validation Error",_584 "originalRequest": {_584 "method": "PUT",_584 "header": [_584 {_584 "key": "Content-Type",_584 "value": "application/json"_584 },_584 {_584 "key": "Accept",_584 "value": "application/json"_584 },_584 {_584 "description": "Added as a part of security scheme: apikey",_584 "key": "X-API-Key",_584 "value": "<API Key>"_584 }_584 ],_584 "body": {_584 "mode": "raw",_584 "raw": "{\n \"name\": \"<string>\",\n \"email\": \"<string>\",\n \"country\": \"<string>\"\n}",_584 "options": {_584 "raw": {_584 "headerFamily": "json",_584 "language": "json"_584 }_584 }_584 },_584 "url": {_584 "raw": "{{baseUrl}}/users/:user_id",_584 "host": ["{{baseUrl}}"],_584 "path": ["users", ":user_id"],_584 "variable": [_584 {_584 "key": "user_id"_584 }_584 ]_584 }_584 },_584 "status": "Unprocessable Entity (WebDAV) (RFC 4918)",_584 "code": 422,_584 "_postman_previewlanguage": "json",_584 "header": [_584 {_584 "key": "Content-Type",_584 "value": "application/json"_584 }_584 ],_584 "cookie": [],_584 "body": "{\n \"detail\": [\n {\n \"loc\": [\n \"<string>\",\n \"<string>\"\n ],\n \"msg\": \"<string>\",\n \"type\": \"<string>\"\n },\n {\n \"loc\": [\n \"<string>\",\n \"<string>\"\n ],\n \"msg\": \"<string>\",\n \"type\": \"<string>\"\n }\n ]\n}"_584 }_584 ]_584 },_584 {_584 "name": "Delete User",_584 "request": {_584 "method": "DELETE",_584 "header": [_584 {_584 "key": "Accept",_584 "value": "application/json"_584 }_584 ],_584 "url": {_584 "raw": "{{baseUrl}}/users/:user_id",_584 "host": ["{{baseUrl}}"],_584 "path": ["users", ":user_id"],_584 "variable": [_584 {_584 "key": "user_id",_584 "value": "<uuid>"_584 }_584 ]_584 }_584 },_584 "response": [_584 {_584 "name": "Successful Response",_584 "originalRequest": {_584 "method": "DELETE",_584 "header": [_584 {_584 "key": "Accept",_584 "value": "application/json"_584 },_584 {_584 "description": "Added as a part of security scheme: apikey",_584 "key": "X-API-Key",_584 "value": "<API Key>"_584 }_584 ],_584 "url": {_584 "raw": "{{baseUrl}}/users/:user_id",_584 "host": ["{{baseUrl}}"],_584 "path": ["users", ":user_id"],_584 "variable": [_584 {_584 "key": "user_id"_584 }_584 ]_584 }_584 },_584 "status": "OK",_584 "code": 200,_584 "_postman_previewlanguage": "json",_584 "header": [_584 {_584 "key": "Content-Type",_584 "value": "application/json"_584 }_584 ],_584 "cookie": [],_584 "body": "{}"_584 },_584 {_584 "name": "Validation Error",_584 "originalRequest": {_584 "method": "DELETE",_584 "header": [_584 {_584 "key": "Accept",_584 "value": "application/json"_584 },_584 {_584 "description": "Added as a part of security scheme: apikey",_584 "key": "X-API-Key",_584 "value": "<API Key>"_584 }_584 ],_584 "url": {_584 "raw": "{{baseUrl}}/users/:user_id",_584 "host": ["{{baseUrl}}"],_584 "path": ["users", ":user_id"],_584 "variable": [_584 {_584 "key": "user_id"_584 }_584 ]_584 }_584 },_584 "status": "Unprocessable Entity (WebDAV) (RFC 4918)",_584 "code": 422,_584 "_postman_previewlanguage": "json",_584 "header": [_584 {_584 "key": "Content-Type",_584 "value": "application/json"_584 }_584 ],_584 "cookie": [],_584 "body": "{\n \"detail\": [\n {\n \"loc\": [\n \"<string>\",\n \"<string>\"\n ],\n \"msg\": \"<string>\",\n \"type\": \"<string>\"\n },\n {\n \"loc\": [\n \"<string>\",\n \"<string>\"\n ],\n \"msg\": \"<string>\",\n \"type\": \"<string>\"\n }\n ]\n}"_584 }_584 ]_584 }_584 ]_584 },_584 {_584 "name": "Get Users",_584 "request": {_584 "method": "GET",_584 "header": [_584 {_584 "key": "Accept",_584 "value": "application/json"_584 }_584 ],_584 "url": {_584 "raw": "{{baseUrl}}/users",_584 "host": ["{{baseUrl}}"],_584 "path": ["users"]_584 }_584 },_584 "response": [_584 {_584 "name": "Successful Response",_584 "originalRequest": {_584 "method": "GET",_584 "header": [_584 {_584 "key": "Accept",_584 "value": "application/json"_584 },_584 {_584 "description": "Added as a part of security scheme: apikey",_584 "key": "X-API-Key",_584 "value": "<API Key>"_584 }_584 ],_584 "url": {_584 "raw": "{{baseUrl}}/users",_584 "host": ["{{baseUrl}}"],_584 "path": ["users"]_584 }_584 },_584 "status": "OK",_584 "code": 200,_584 "_postman_previewlanguage": "json",_584 "header": [_584 {_584 "key": "Content-Type",_584 "value": "application/json"_584 }_584 ],_584 "cookie": [],_584 "body": "{}"_584 }_584 ]_584 },_584 {_584 "name": "Create User",_584 "request": {_584 "method": "POST",_584 "header": [_584 {_584 "key": "Content-Type",_584 "value": "application/json"_584 },_584 {_584 "key": "Accept",_584 "value": "application/json"_584 }_584 ],_584 "body": {_584 "mode": "raw",_584 "raw": "{\n \"name\": \"Me\",\n \"email\": \"hello@world.com\",\n \"country\": \"USA\"\n}",_584 "options": {_584 "raw": {_584 "headerFamily": "json",_584 "language": "json"_584 }_584 }_584 },_584 "url": {_584 "raw": "{{baseUrl}}/users",_584 "host": ["{{baseUrl}}"],_584 "path": ["users"]_584 }_584 },_584 "response": [_584 {_584 "name": "Successful Response",_584 "originalRequest": {_584 "method": "POST",_584 "header": [_584 {_584 "key": "Content-Type",_584 "value": "application/json"_584 },_584 {_584 "key": "Accept",_584 "value": "application/json"_584 },_584 {_584 "description": "Added as a part of security scheme: apikey",_584 "key": "X-API-Key",_584 "value": "<API Key>"_584 }_584 ],_584 "body": {_584 "mode": "raw",_584 "raw": "{\n \"name\": \"<string>\",\n \"email\": \"<string>\",\n \"country\": \"<string>\"\n}",_584 "options": {_584 "raw": {_584 "headerFamily": "json",_584 "language": "json"_584 }_584 }_584 },_584 "url": {_584 "raw": "{{baseUrl}}/users",_584 "host": ["{{baseUrl}}"],_584 "path": ["users"]_584 }_584 },_584 "status": "OK",_584 "code": 200,_584 "_postman_previewlanguage": "json",_584 "header": [_584 {_584 "key": "Content-Type",_584 "value": "application/json"_584 }_584 ],_584 "cookie": [],_584 "body": "{}"_584 },_584 {_584 "name": "Validation Error",_584 "originalRequest": {_584 "method": "POST",_584 "header": [_584 {_584 "key": "Content-Type",_584 "value": "application/json"_584 },_584 {_584 "key": "Accept",_584 "value": "application/json"_584 },_584 {_584 "description": "Added as a part of security scheme: apikey",_584 "key": "X-API-Key",_584 "value": "<API Key>"_584 }_584 ],_584 "body": {_584 "mode": "raw",_584 "raw": "{\n \"name\": \"<string>\",\n \"email\": \"<string>\",\n \"country\": \"<string>\"\n}",_584 "options": {_584 "raw": {_584 "headerFamily": "json",_584 "language": "json"_584 }_584 }_584 },_584 "url": {_584 "raw": "{{baseUrl}}/users",_584 "host": ["{{baseUrl}}"],_584 "path": ["users"]_584 }_584 },_584 "status": "Unprocessable Entity (WebDAV) (RFC 4918)",_584 "code": 422,_584 "_postman_previewlanguage": "json",_584 "header": [_584 {_584 "key": "Content-Type",_584 "value": "application/json"_584 }_584 ],_584 "cookie": [],_584 "body": "{\n \"detail\": [\n {\n \"loc\": [\n \"<string>\",\n \"<string>\"\n ],\n \"msg\": \"<string>\",\n \"type\": \"<string>\"\n },\n {\n \"loc\": [\n \"<string>\",\n \"<string>\"\n ],\n \"msg\": \"<string>\",\n \"type\": \"<string>\"\n }\n ]\n}"_584 }_584 ]_584 }_584 ]_584 }_584 ],_584 "auth": {_584 "type": "apikey",_584 "apikey": [_584 {_584 "key": "value",_584 "value": "{{apiKey}}",_584 "type": "string"_584 },_584 {_584 "key": "key",_584 "value": "X-API-Key",_584 "type": "string"_584 }_584 ]_584 },_584 "event": [_584 {_584 "listen": "prerequest",_584 "script": {_584 "type": "text/javascript",_584 "exec": [""]_584 }_584 },_584 {_584 "listen": "test",_584 "script": {_584 "type": "text/javascript",_584 "exec": [""]_584 }_584 }_584 ],_584 "variable": [_584 {_584 "key": "baseUrl",_584 "value": "http://localhost:8000",_584 "type": "string"_584 }_584 ]_584}
How to Create a Collection
To create a Collection, click the button in the top-left corner.
Generate Collection from OAS (Hot Tip )
Generating your collections from an OAS can save a lot of time in bootstrapping
your Collection of example requests. Postman will automatically create a
baseUrl variable and setup Authentication based on your OAS. It will also
bootstrap requests for every operation prepopulating parameters from the
schemas in your OAS. This
is especially helpful if your API is complicated.
- Make sure the APIs element is visible on the sidebar by configuring your sidebar
- Create an API and give it a name
- Import your OAS
- If you are using our example API then import
openapi.jsonfrom the repository
- If you are using our example API then import
- Generate a collection from your definition
The generated Collection will live in the "APIs" tab under your OAS definition. This is slightly confusing as it won't be visible under the "Collections" tab.
If you want you can copy the Collection from your API tab to the Collections tab
by clicking the button next to your Collection.
Variables
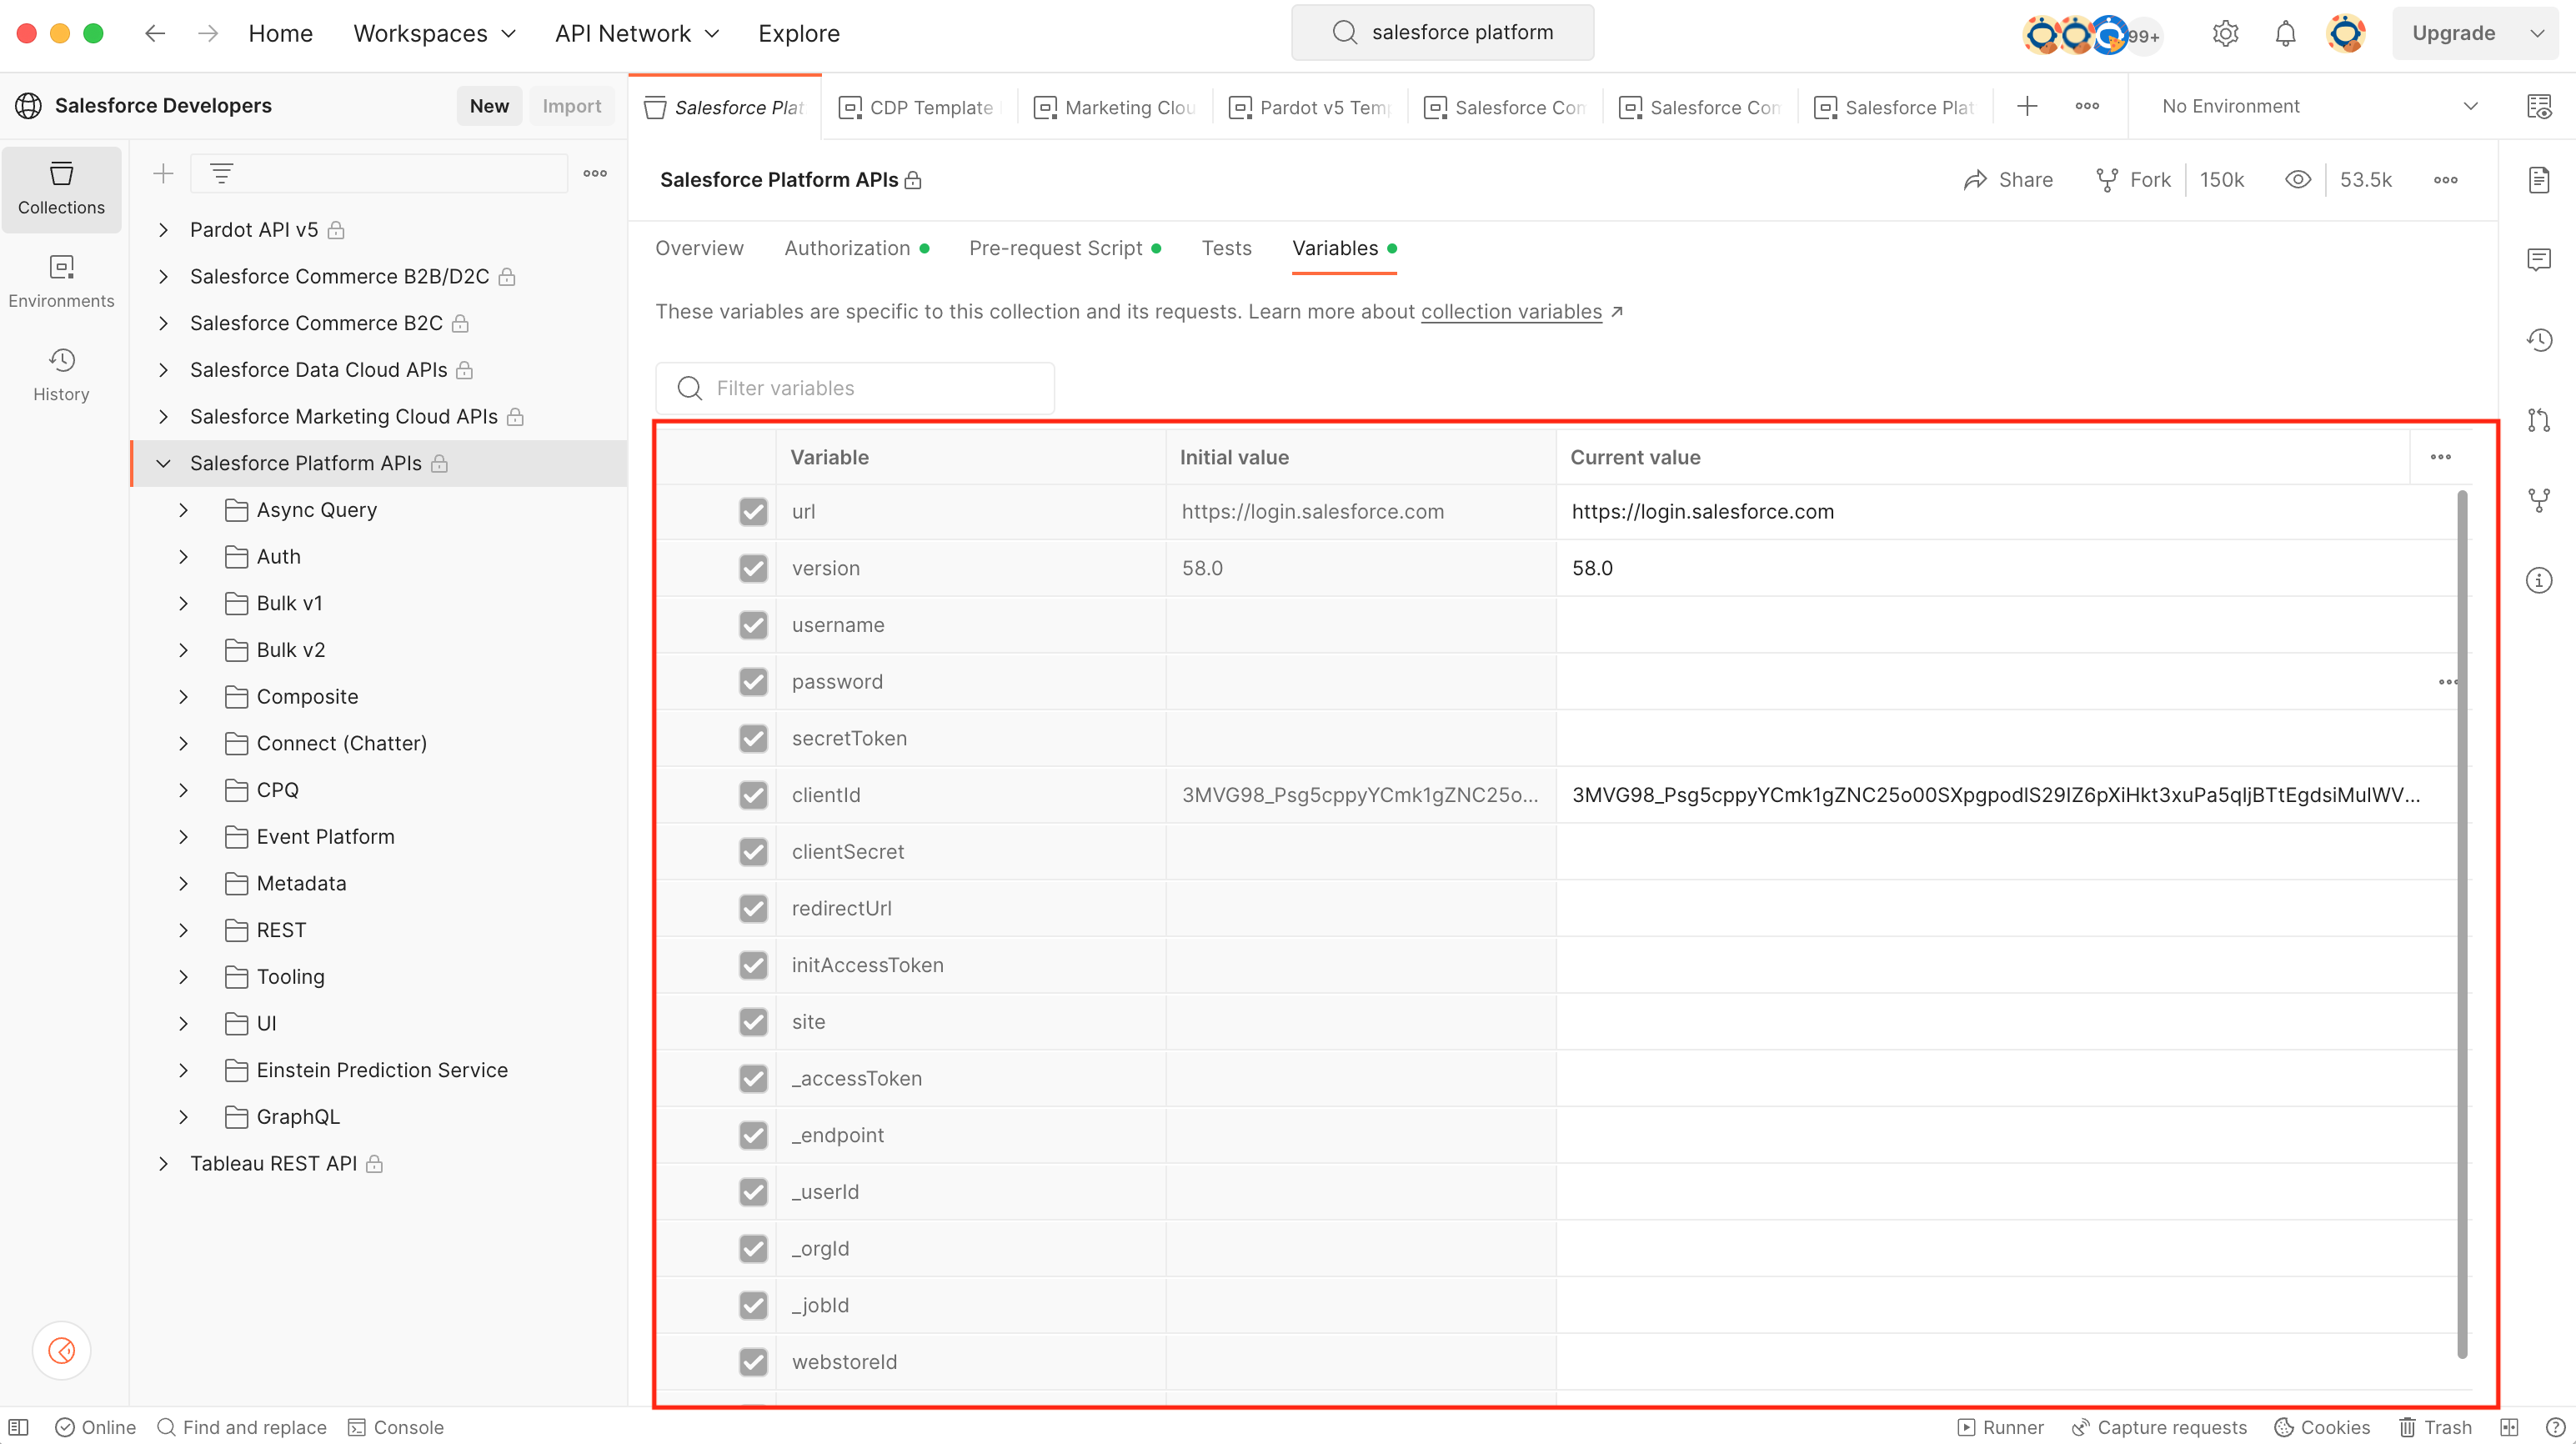
Collections can store dynamic values called a Variable that can be used when constructing a Request. Variables save a lot of time when you have common values across multiple requests in your Collection. Try to always use Variables to organize your values into one place and allow for easy parameterization of your requests.
Always Create a baseUrl Variable (Hot Tip )
We suggest that you always start with a Variable named baseUrl. Using a
single baseUrl variable allows you to quickly configure API environments (e.g.
development, staging, production, etc.) and shorten the URL in your requests.
- Go to "Variables" tab
- Create a variable named "baseUrl"
- Add a request
- Use the curly brace syntax to shorten the URL
- Click "Send"
Sometimes you need to parameterize your baseUrl which is possible using
the curly brace syntax inside of the Variable's value. For example, you
might have domains based on a "provider" like aws or "region" like
us-east-1.
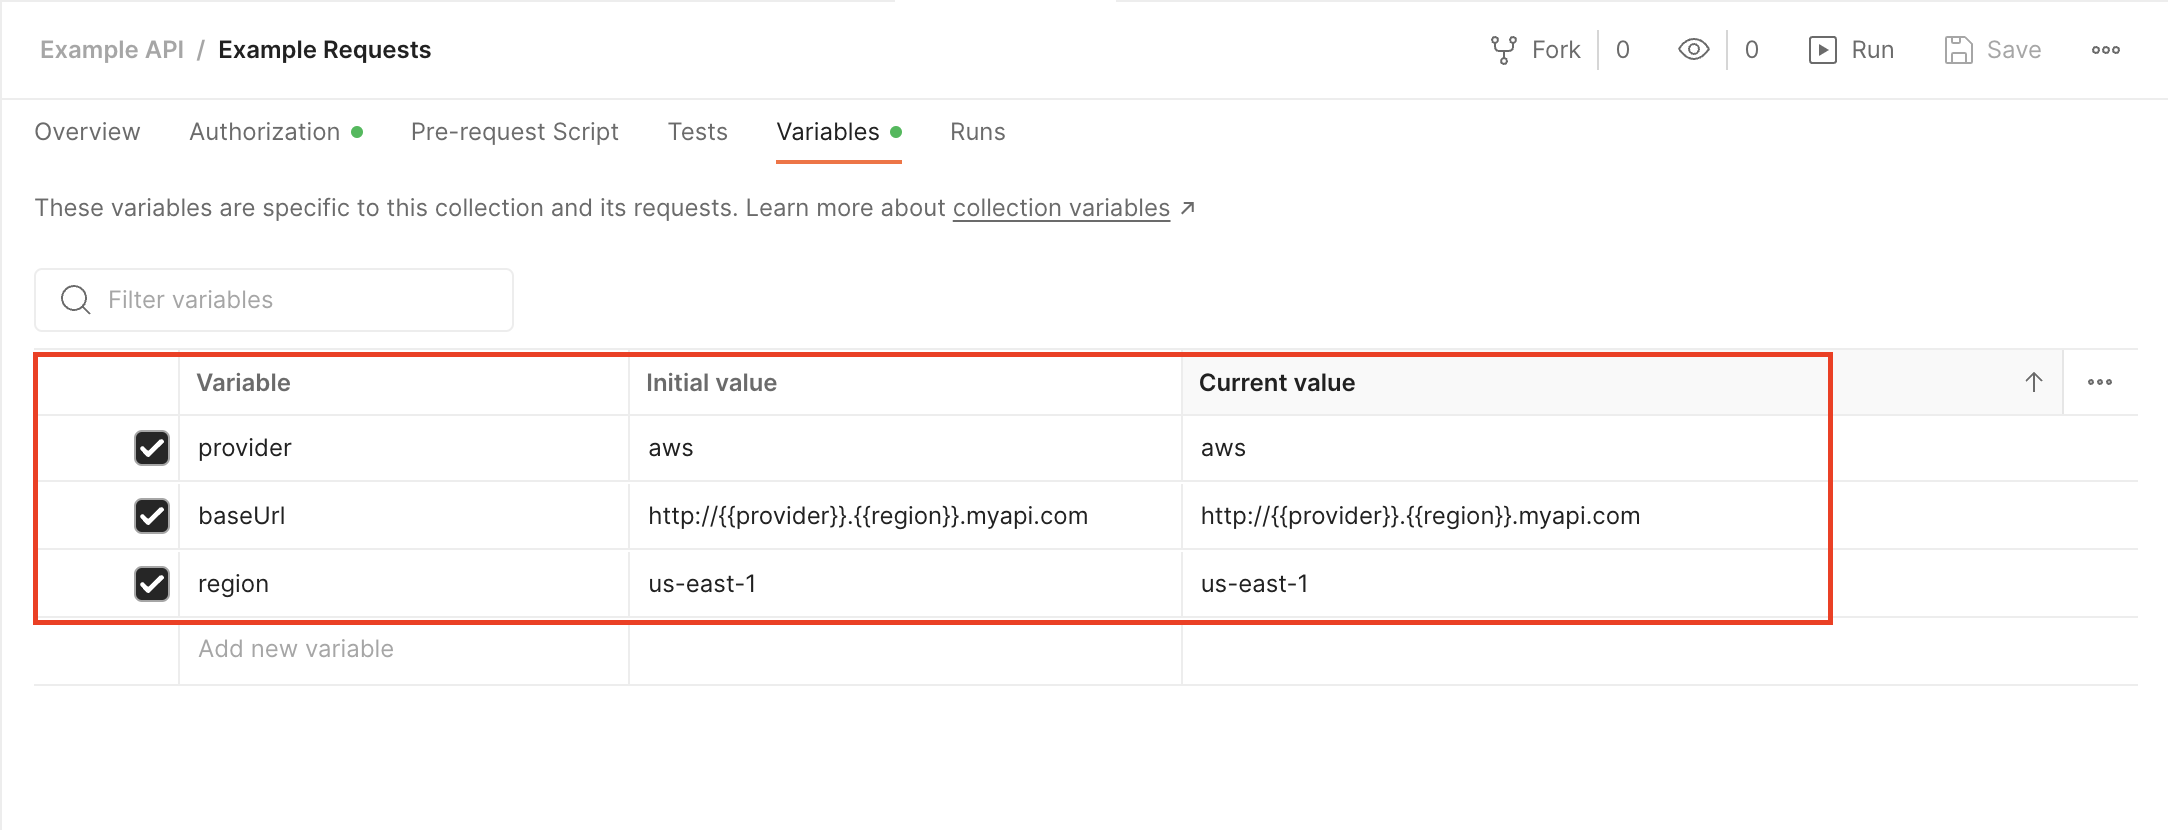
It's not obvious that this works but it does. But it allows for more powerful variables when you need them.
Curly Brace Syntax
You may have noticed that Postman provides a syntax for inserting variables
using curly braces. If you are familiar with templating engines like
Mustache or
Handlebars, this syntax should feel familiar. You
can use the the curly brace syntax (e.g. {{variable}}) to insert a variable
anywhere in your Request.
For example in the URL.

Or as a path parameter.
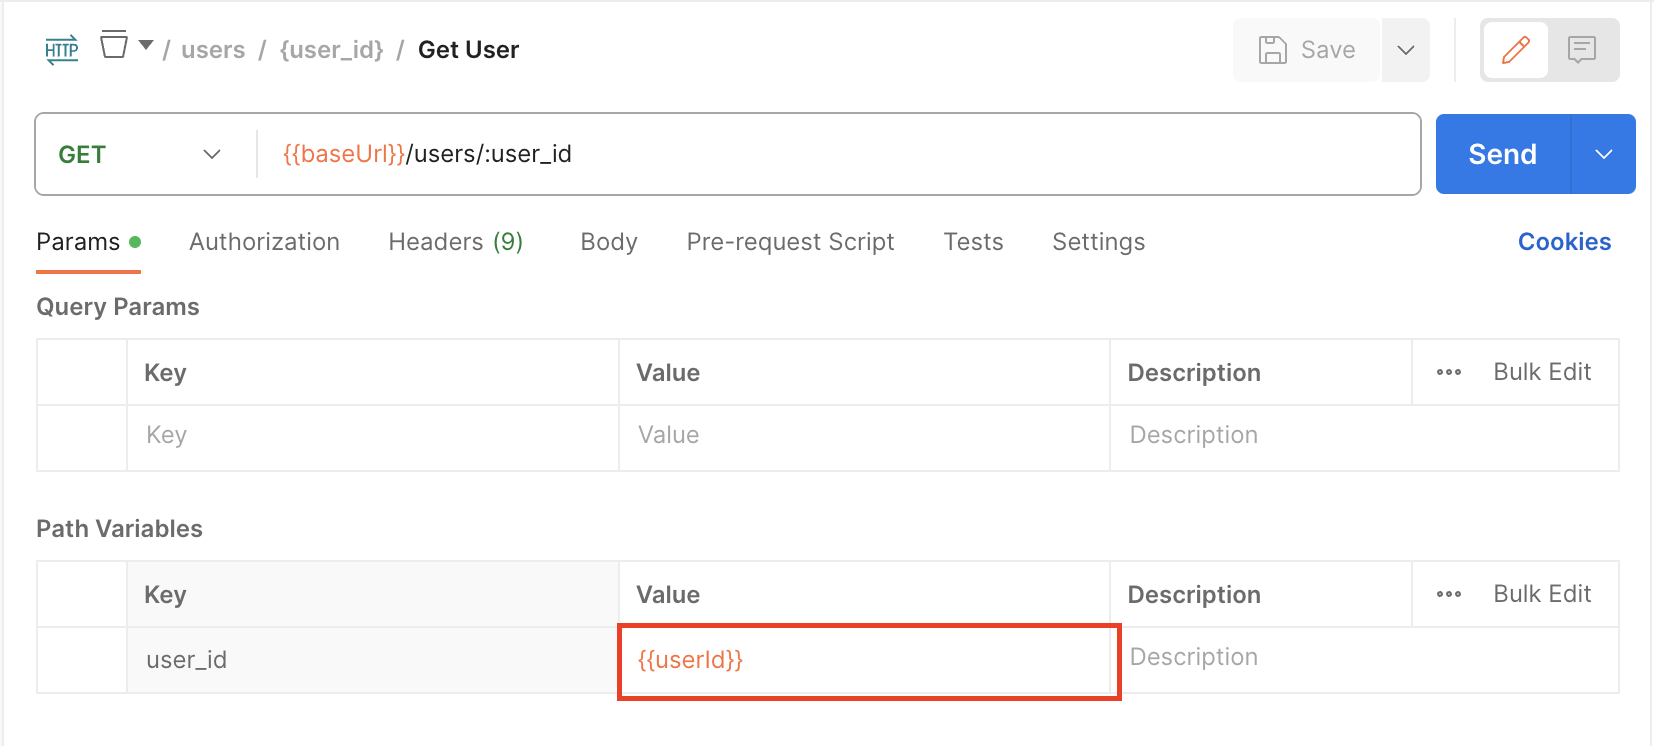
What is "Initial value" vs. "Current value"?
You also may have noticed there is an "Initial value" and "Current value" column under the "Variables" tab. This is a convenient feature from Postman that allows you to save variable values for your teammates.

The "Initial value" is shared in your Workspace with collaborators while "Current value" is kept local to your session.
- Use "Initial value" to store helpful examples (i.e. query example) or commonly
shared values (
baseUrl) - Edit the "Current value" for configuring temporary values
To reset all your current values to initial values at once, Click the Reset all button on the right side. To reset a single variable, Click the Reset button.
To persist your current values to initial values, Click the Persist all button
on the right side. To persist a single variable, Click the Persist button.
Variable Scope
Variables live in a
Scope.
In the last section, we made a variable in the scope of a Collection. But
variables can also be added to Global and Environment scopes.
Scopes help define where a Variable is available to use.
- Global scope variables are available everywhere in your Workspace
- Environment scope variables are available when the environment is active
- You can configure your Environment by selecting the menu in the top-right corner
- Collection scope variables are only available to a Collection
As a rule of thumb, you should organize authorization variables in the Environment Scope and API-specific variables in the Collection Scope. The Global Scope is mainly used in scripting.
Authorization
Postman includes built-in support for various authorization types, allowing you to quickly configure security credentials for all requests within a Collection. Postman supports nearly all necessary authorization types from Basic HTTP authentication to OAuth. You can also use Variables from your Environment to organize security credentials for a workspace.
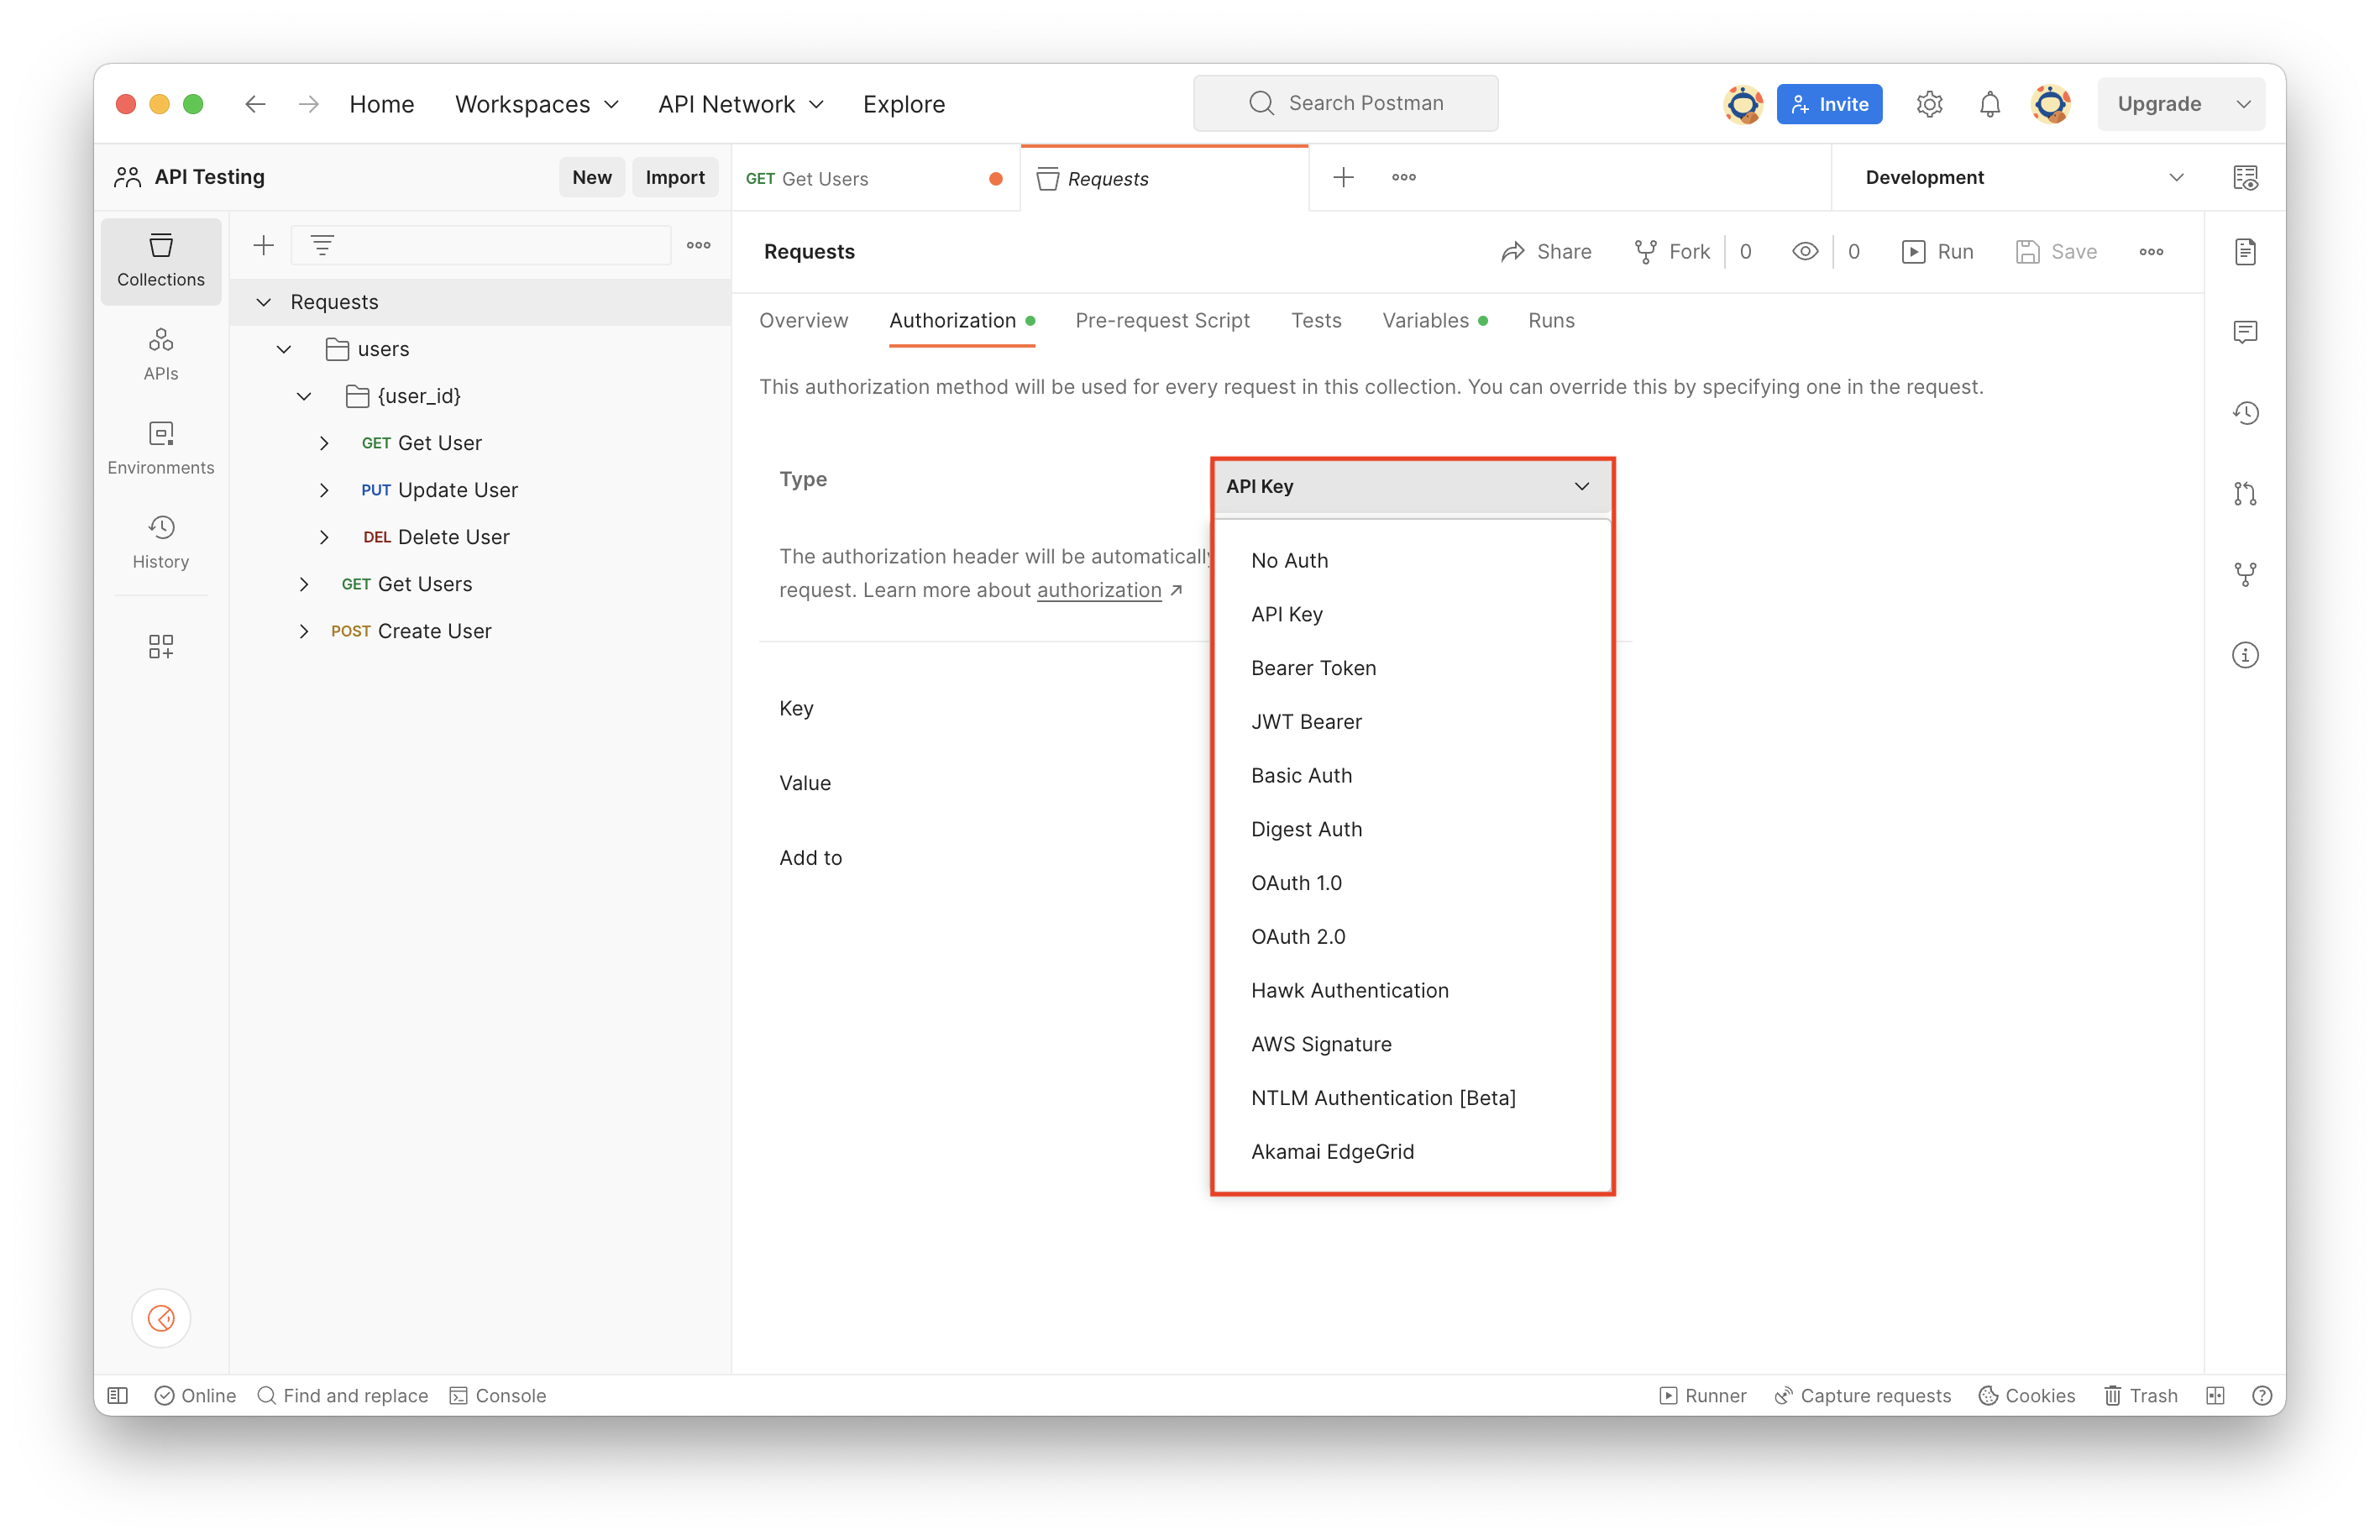
Here is a quick demonstration of configuring API key Authorization for a Collection.
- Go to the Collection's Authorization tab
- Configure the Authorization type
- In this case we need to provide the
X-API-Keyheader
- In this case we need to provide the
- Create an Environment Variable for your credentials
- Set the Variable as
secretso the value is masked on the screen. Setting a variable tosecretsimply makes it masked in the UI. - Ensure that your request is set to
Inherit auth from parent(i.e. Collection) - Click
Sendto test your credentials
Tips
Using Environment Scope
We strongly suggest putting authentication credentials in an Environment Scope so your teammates can document authorization requirements and reuse the authentication credentials. Otherwise you will have to tediously add the security credentials to the Variables of every Collection.
Avoid Persisting Sensitive Credentials
If you want to avoid persisting sensitive credentials, you can leave the "Initial value" column blank. This way you always set the variable by configuring the "Current value" column.
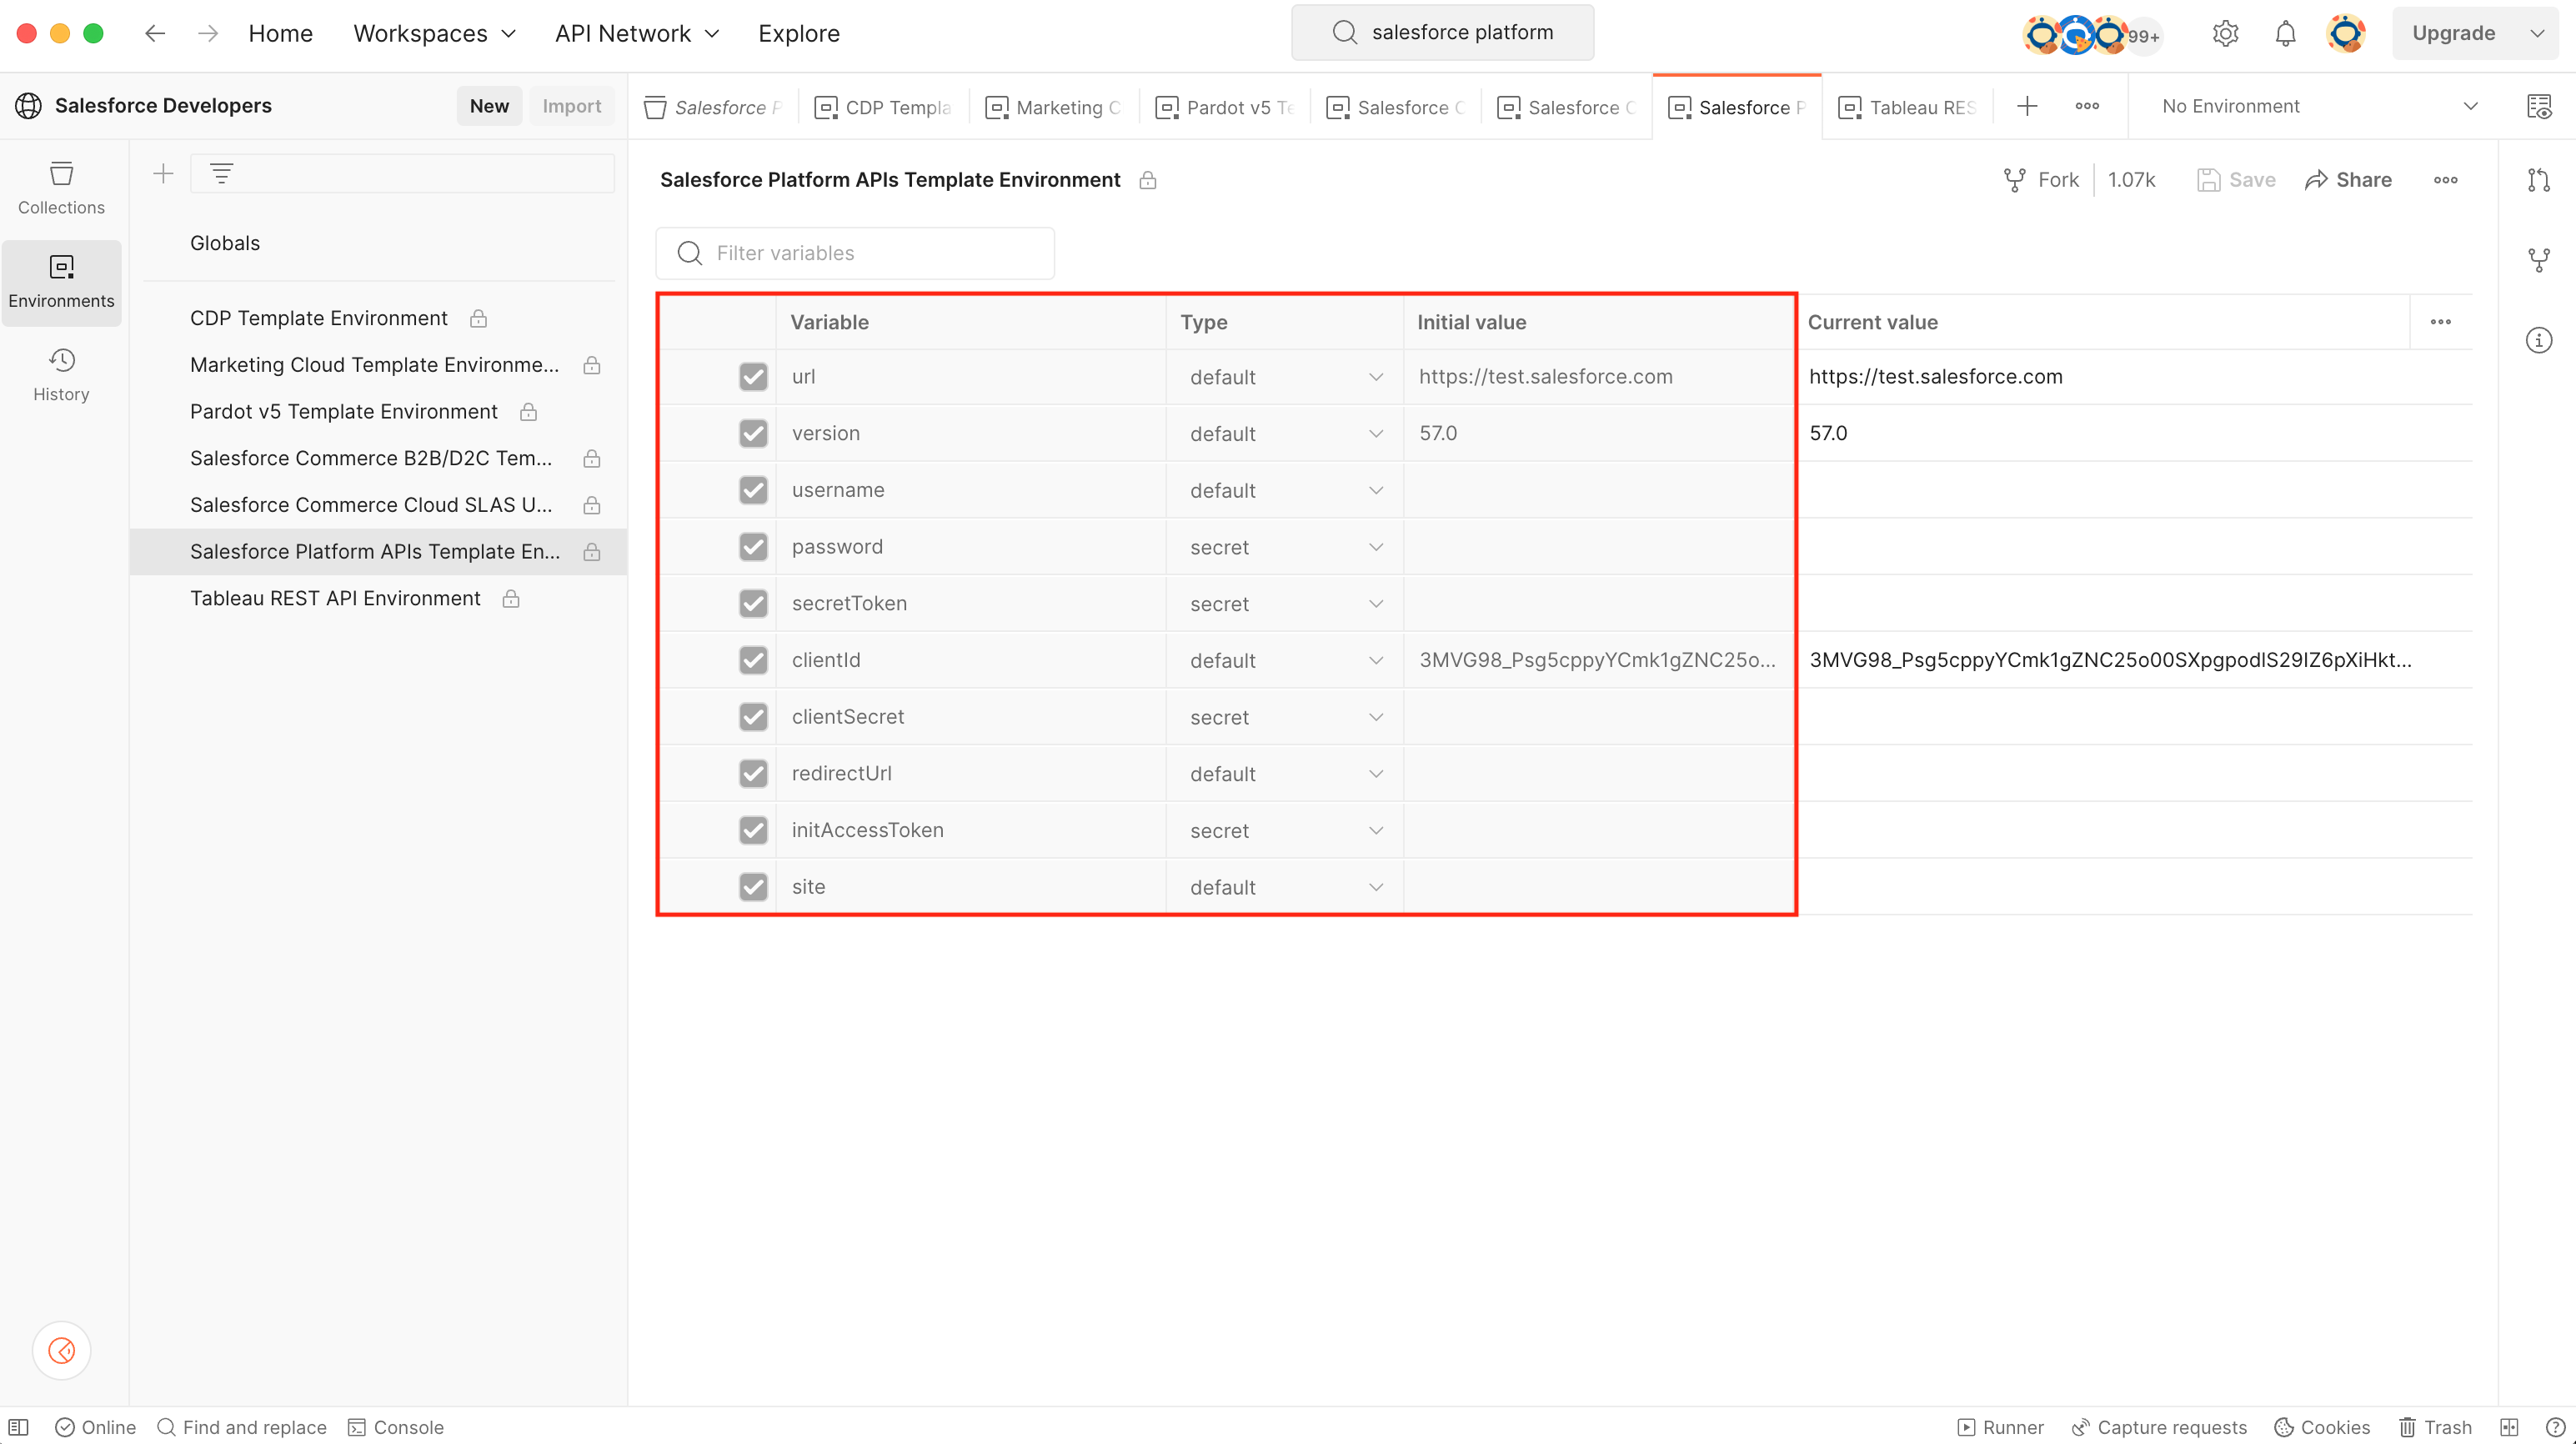
Postman does not support your authentication scheme?
If Postman does not natively support your Authorization type then you can use the "Pre-request Script" tab under your Collection to programmatically set Environment Variables.
For example, you can use the following script to add 3 header values from your environment variables. Postman runs the Pre-request script for your Collection before every Request so these headers will be conveniently applied for every request.

Copy Code
_10pm.request.addHeader({ key: "client_id", value: pm.environment.get("CLIENT_ID") })_10pm.request.addHeader({ key: "client_secret", value: pm.environment.get("CLIENT_SECRET") })_10pm.request.addHeader({ key: "module_secret", value: pm.environment.get("MODULE_SECRET") })
Console (Hot Tip )
Open the console at the bottom of the window to inspect your requests. This is especially helpful for debugging programmatic collections or many requests.
Recap
There are a lot of considerations when implementing an API testing strategy. Instead of building API testing infrastructure from scratch, we suggest you use Postman as it provides a robust data model and intuitive UX to effectively organize your documentation and testing for your API. But Postman goes much further than just organizing your requests.
Further Reading
We suggest taking a look at Postman's documentation about writing scripts and running collections to learn how to create advanced test suites with Postman.
